The best plugin to make your WordPress site load faster with a few clicks is WP-Rocket plugin.
The main purpose of it is to work as a cache plugin and consequently improve organic traffic.
It is compatible with many other services like Image Caching, CDNs, SG Optimizer, Cloudflare and many other optimization plugins.
The default optimal WP-Rocket settings are automatically enabled based on your current WordPress configuration of themes, files and plugins. In addition to that you can change some of the settings which are not enabled
On Facebook, there is a private group for this plugin community.
Here you can discuss your problems and present your ideas. Sometimes this plugin may break the layout, CSS and other scripts when settings are not properly enabled.
You can use the trial and error method of configuring this plugin. You can change each setting and see if anything has broken down or on the contrary, anything positive has happen.
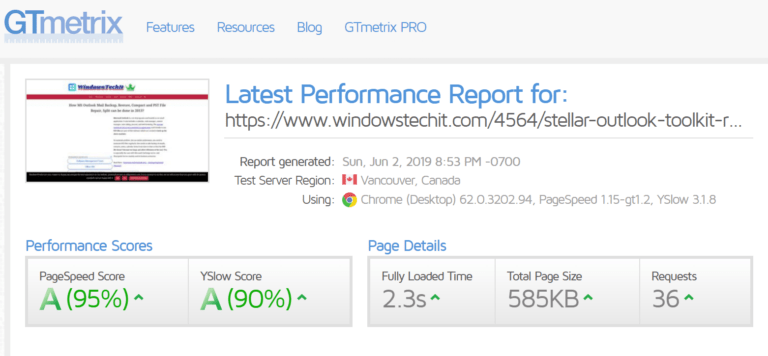
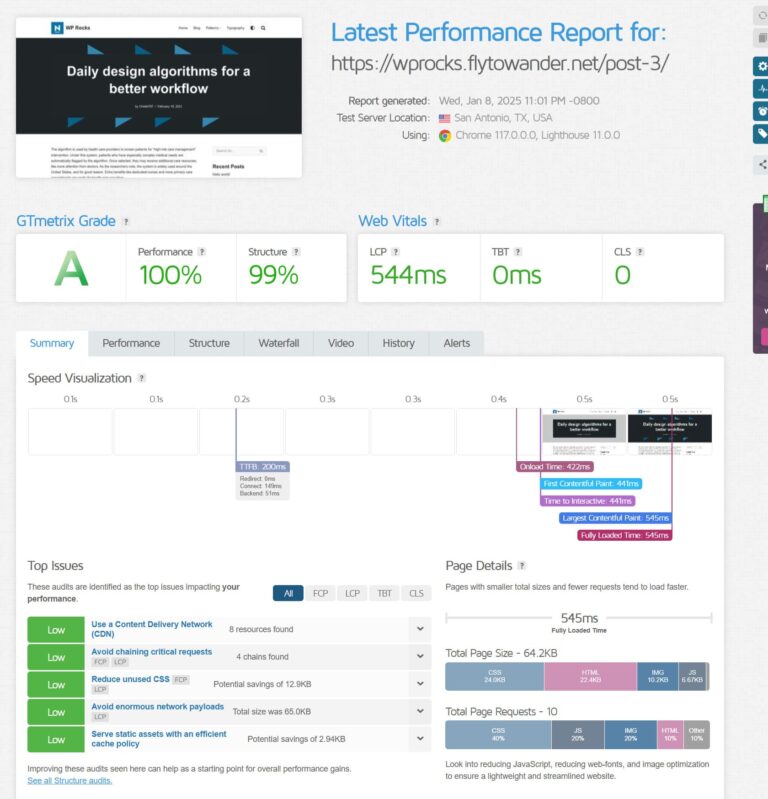
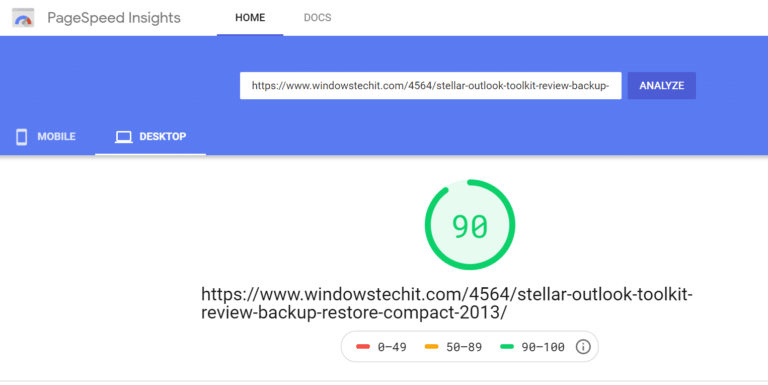
This may include better score on PageSpeed Insights Tool or Pingdom. In this WP Rocket speed test, you can see the results
Features of WP-Rocket WordPress Plugin
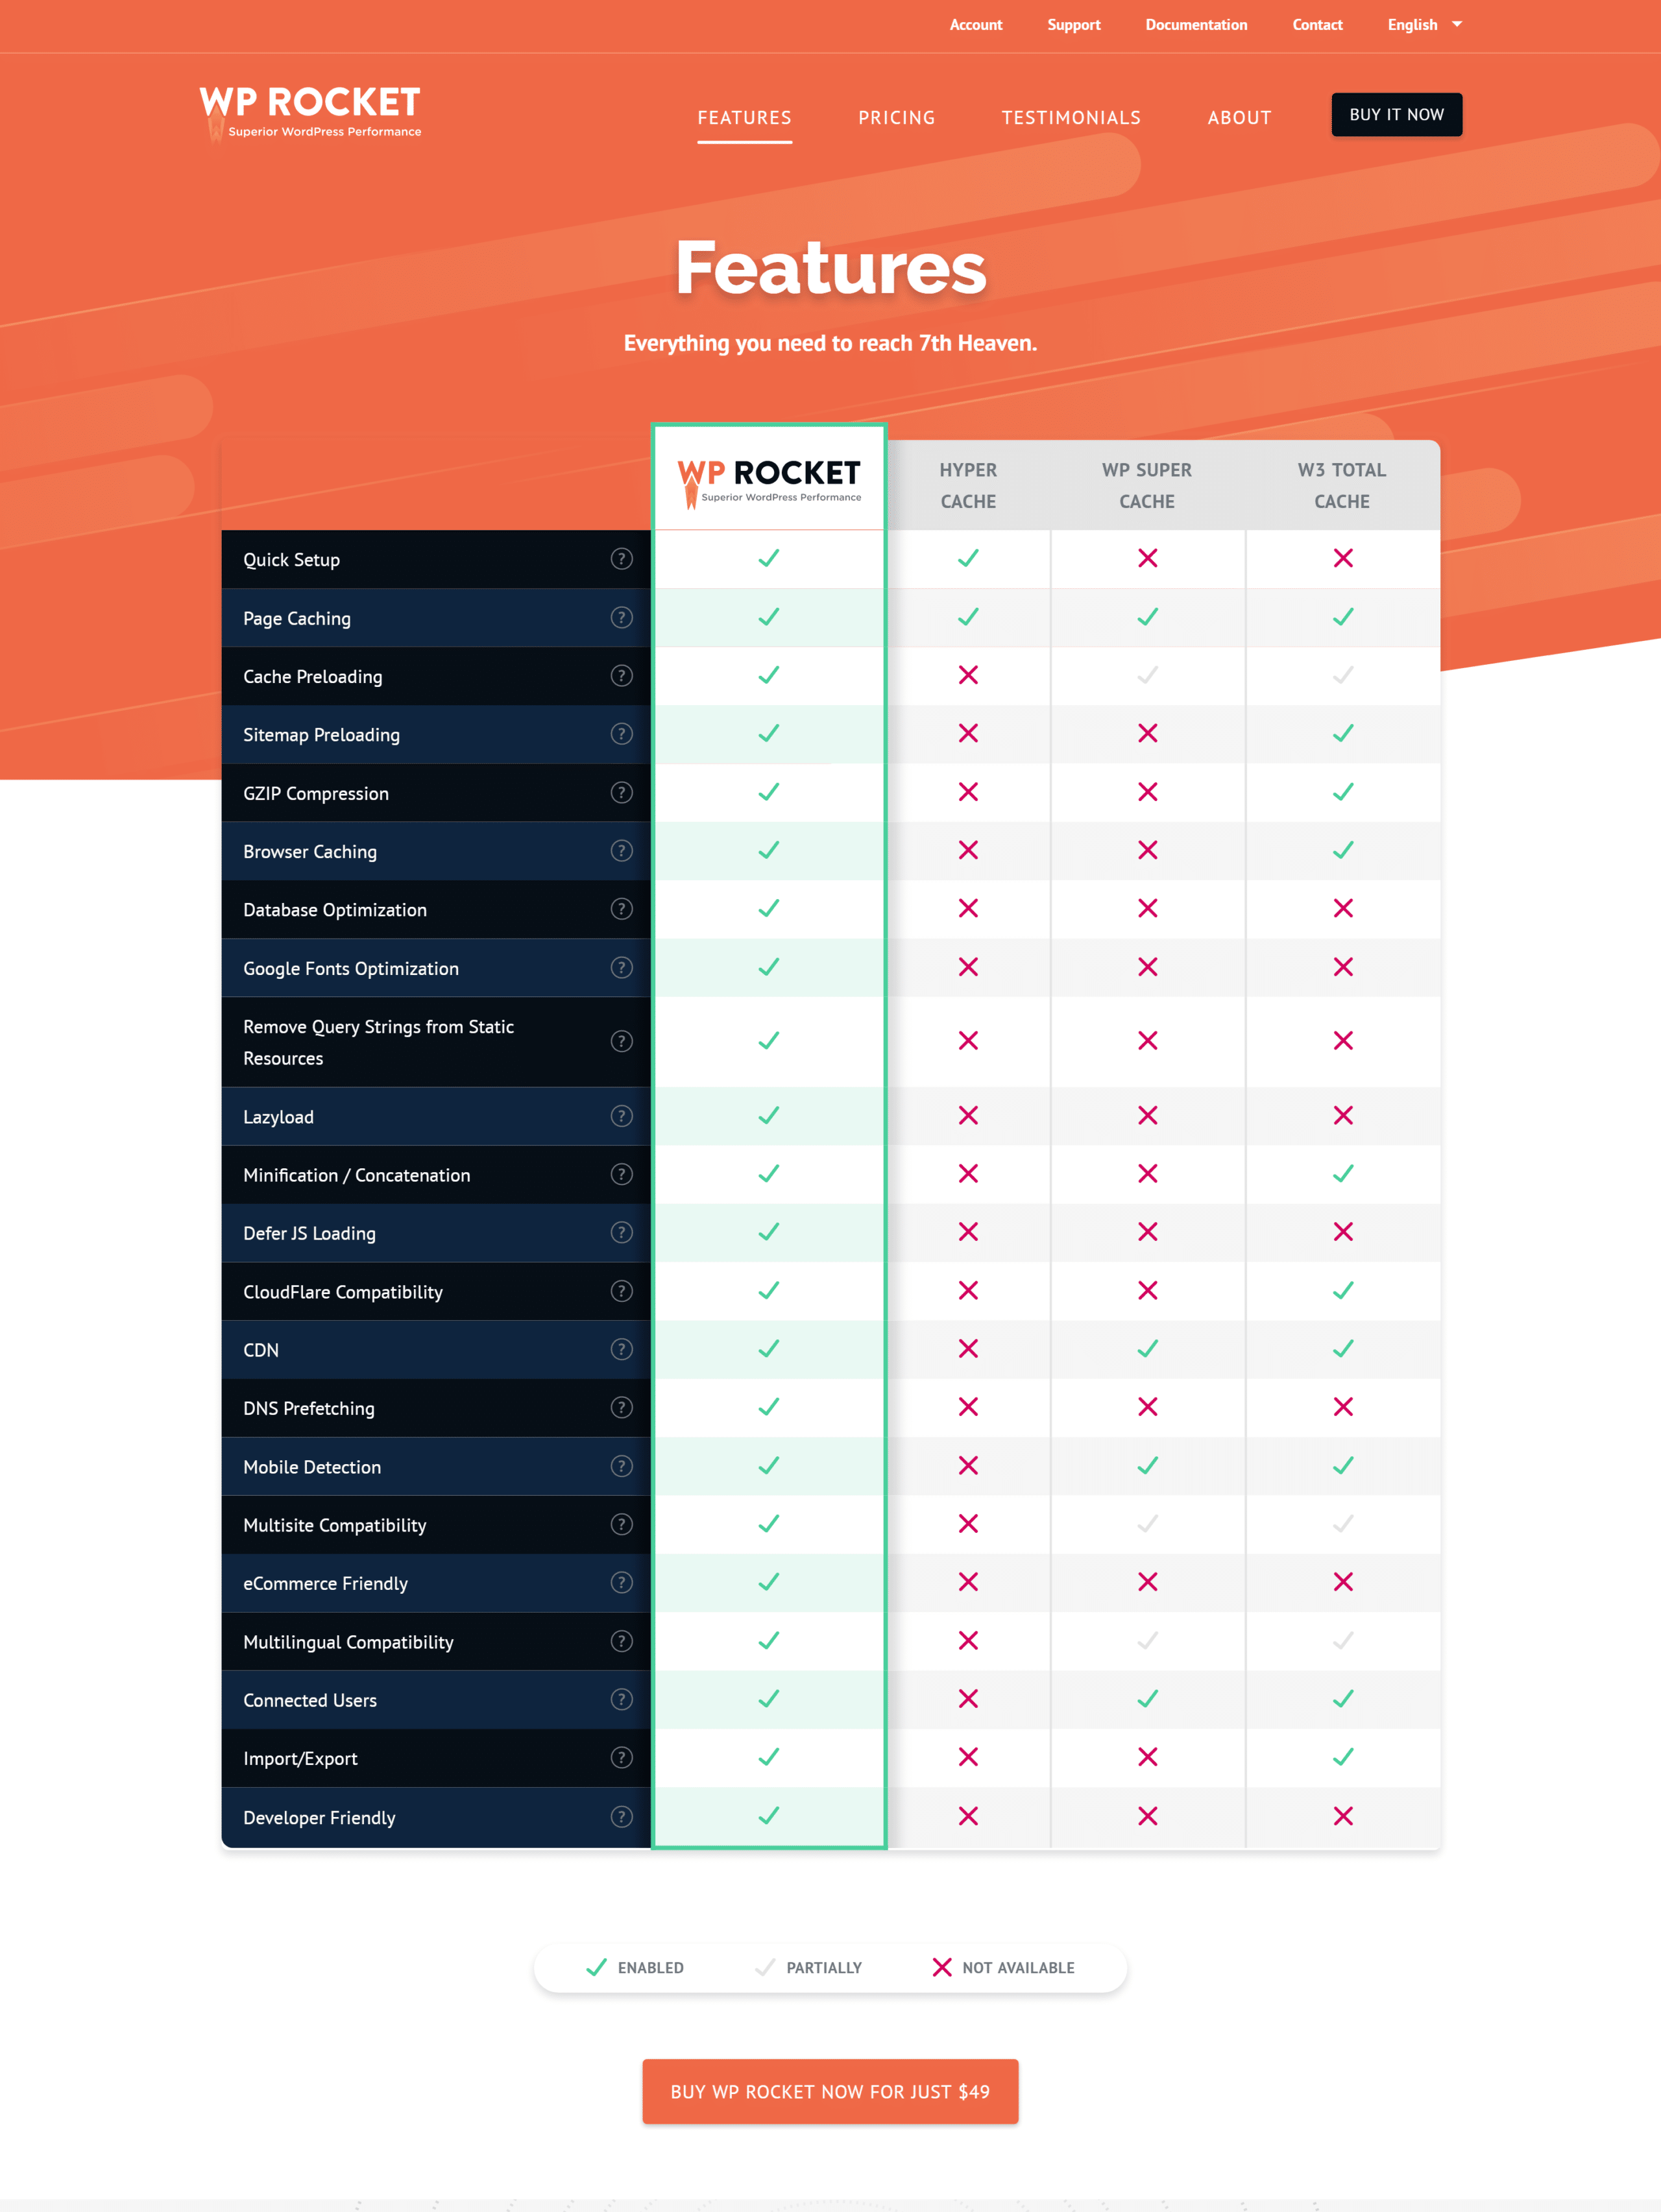
To see the complete image, click on it. Then using Ctrl + scroll button of the mouse you can zoom in or out.
Best WP Rocket Settings For 2025 (To Pass Core Web Vitals)
Website performance and loading speed have become crucial factors for achieving top search engine rankings. WP Rocket, a leading WordPress caching plugin, is a game-changer when it comes to improving website speed and passing Core Web Vitals. In this article, we will guide you through the best WP Rocket settings for 2025, ensuring optimal performance and improved SEO results.
WP Rocket Speed Tests
Before diving into the settings, it is important to perform speed tests to understand your website’s current performance. Tools like Google PageSpeed Insights, GTmetrix, and Pingdom Tools can provide insights into loading times, Core Web Vitals metrics, and overall page performance.
Key Metrics to Measure:
- Largest Contentful Paint (LCP): Measures loading performance.
- First Input Delay (FID): Tracks interactivity.
- Cumulative Layout Shift (CLS): Monitors visual stability.
Conducting these tests before and after configuring WP Rocket will show measurable improvements.
Best WP Rocket Settings Overview (2025)
WP Rocket simplifies the process of website optimization by offering user-friendly settings. The key categories include:
- Cache
- File Optimization
- Media
- Preloading
- Database
- CDN
- Advanced Rules
- Add-ons
Let’s explore each of these in detail.
Default Settings of WP Rocket (2025)
- DASHBOARD
- CACHE
- FILE OPTIMIZATION
- MEDIA
- PRELOAD
- ADVANCED RULES
- DATABASE
- CDN
- HEARTBEAT
- ADD-ONS
- IMAGE OPTIMIZATION
- TOOLS
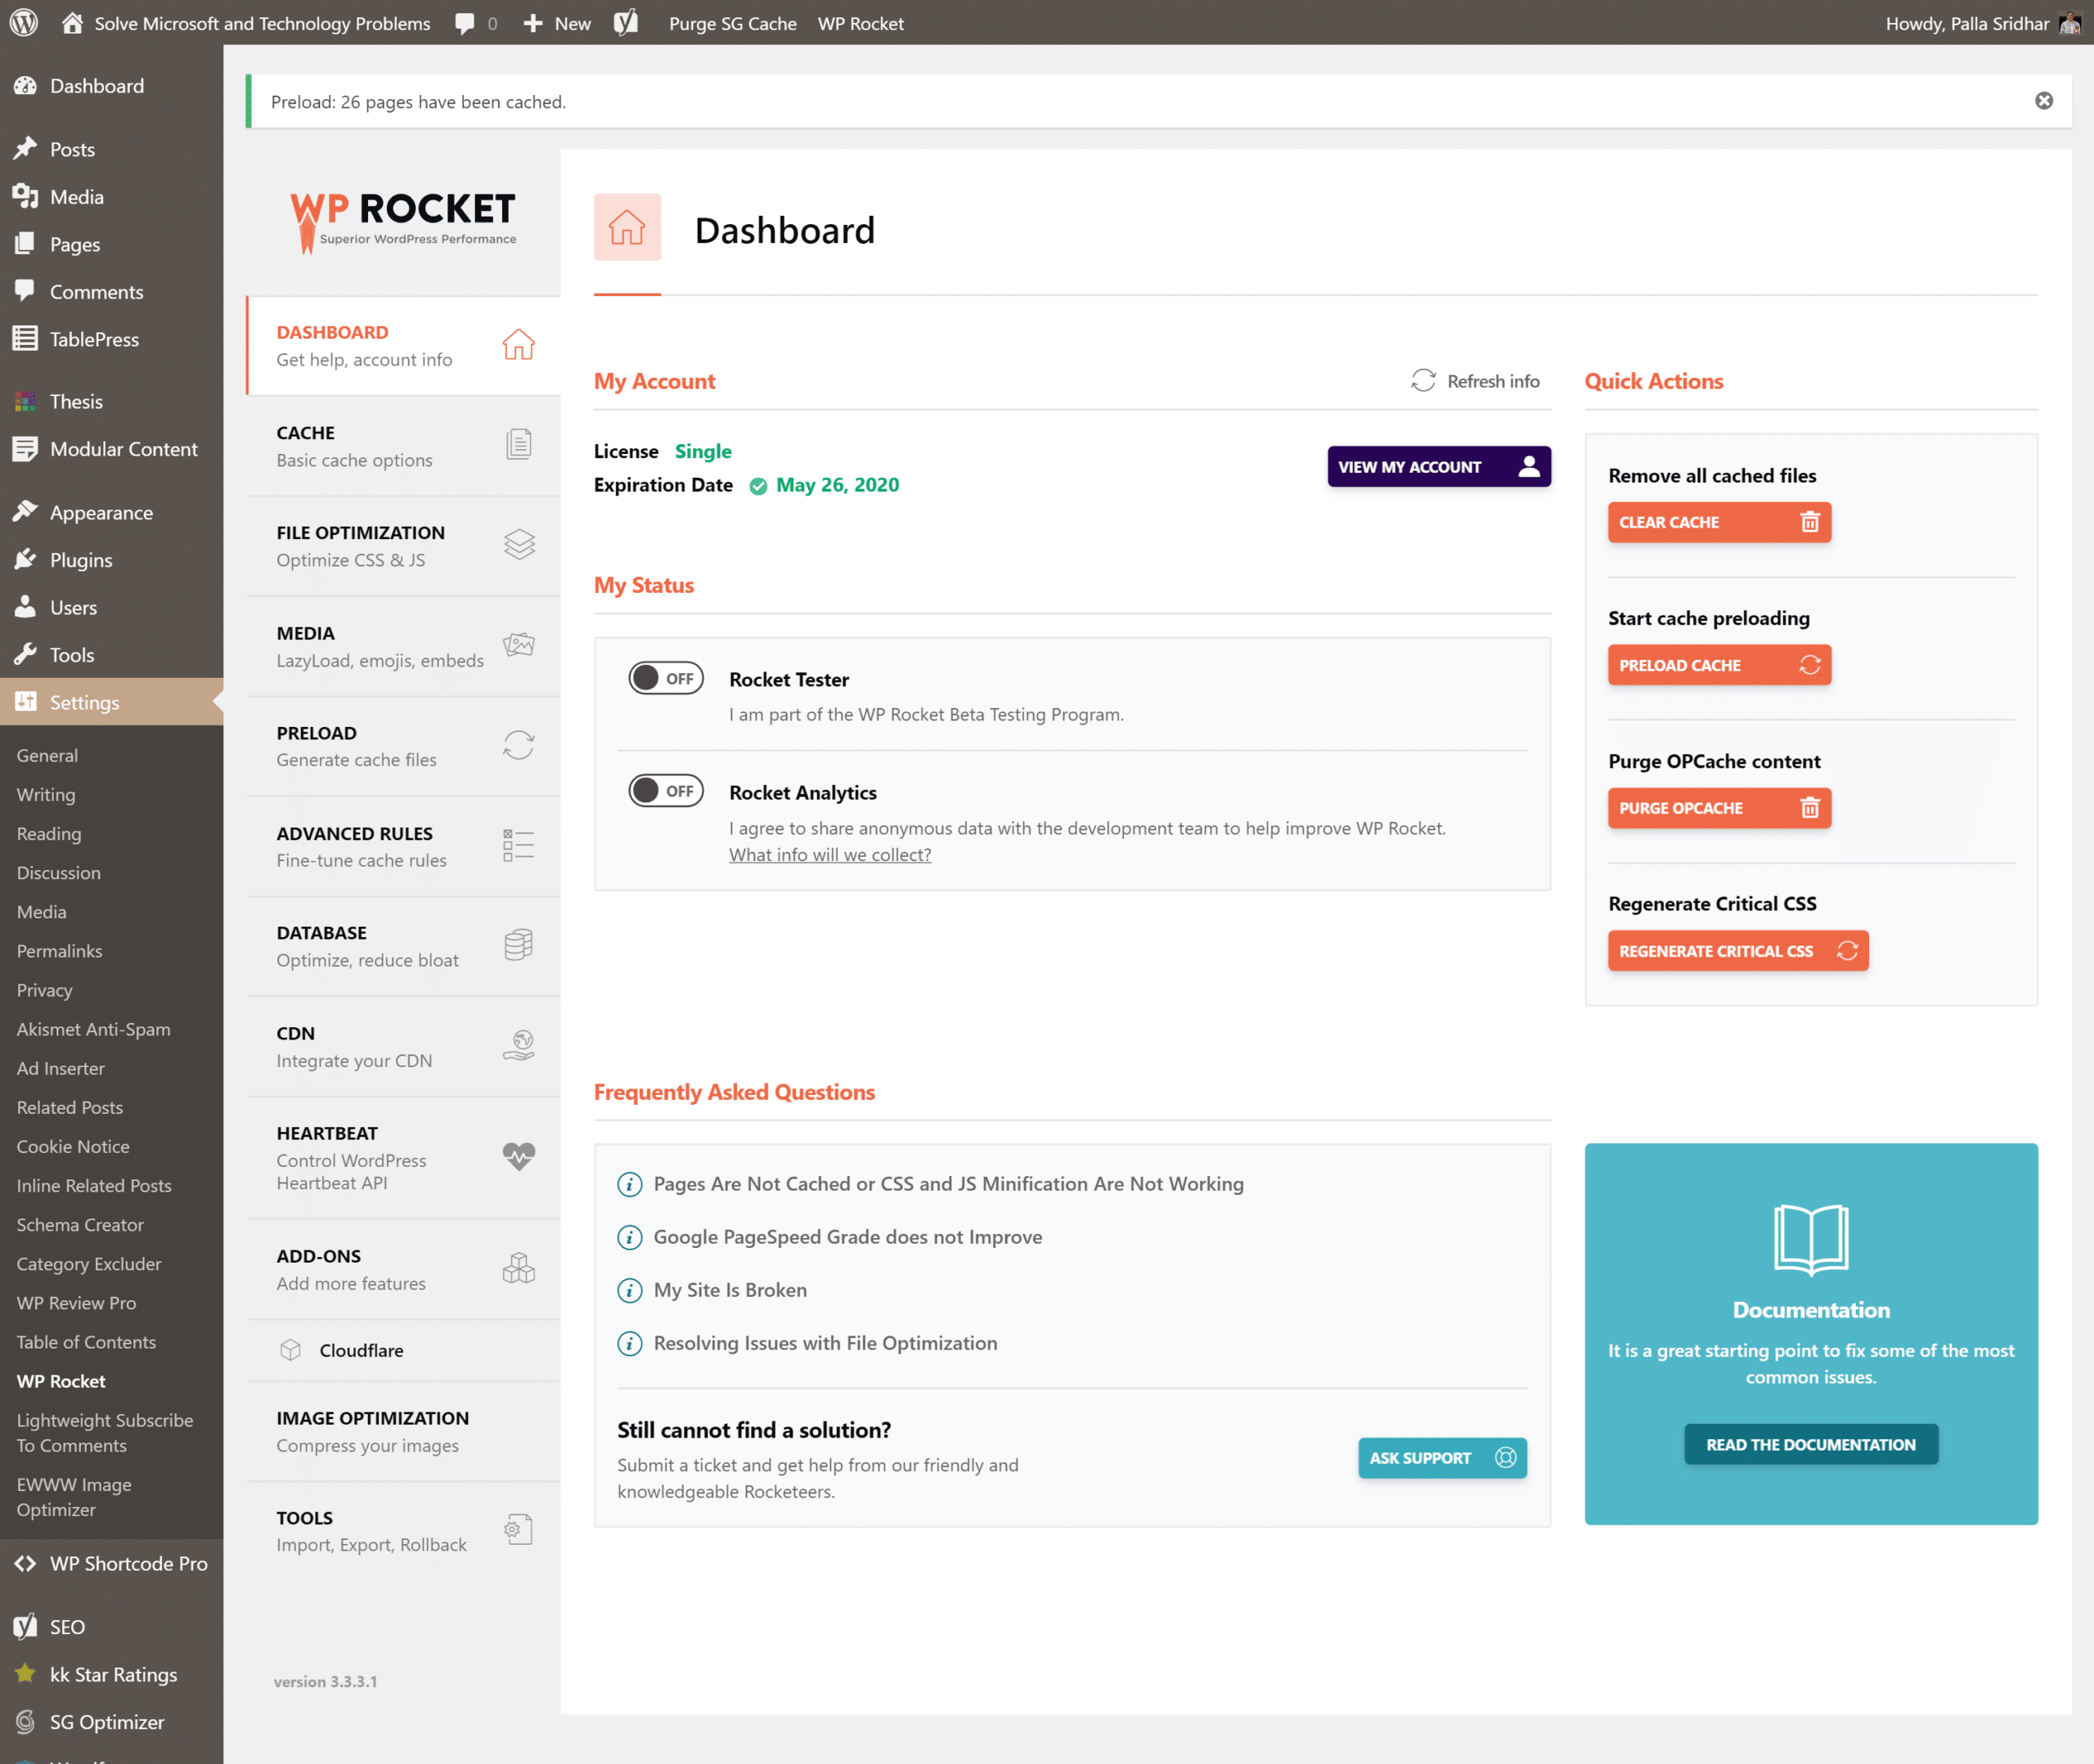
1. Dashboard
The WP Rocket dashboard is your central hub for managing settings and monitoring performance. Key features include:
- Quick Actions: Clear cache, regenerate critical CSS, and preload cache with one click.
- License Management: Manage your WP Rocket subscription.
Make it a habit to clear cache after making changes to ensure your site updates reflect immediately.
1. License, Expiration Date
2. Rocket Tester
3. Rocket Analytics
4. Remove all cached files
5. Start cache preloading
6. Purge OPCache content
7. Regenerate Critical CSS
2. Cache
Caching reduces server load and speeds up website delivery. Configure the following:
- Enable Cache for Logged-In Users: Useful for membership sites.
- Set Cache Lifespan: A value of 10 hours works well for most websites.
1. Mobile Cache.
Speed up your site for mobile visitors.
There are two options here.
1. Enable caching for mobile devices.
2. Separate cache files for mobile devices.
Mobile caches works best, when both options are enabled.
2. User CACHE
This is useful when you have a membership site or multiple users using logged in access of your site. For normal visitors, cache will be normal when not logged in. But for logged-in users, a different cache is set.
The following option is available.
Enable caching for logged-in WordPress users.
3. Cache Lifespan
This is the amount of time after which all cache files are removed. When you combine this option with preloading, the cache will be rebuilt automatically after expiration.
3. File Optimization
File optimization is crucial for reducing file sizes and improving loading speed.
Minify CSS and JS Files
Minification removes unnecessary spaces and comments from code, reducing file sizes. Enable CSS and JavaScript minification for better performance.
Combine CSS and JS Files
Combining files reduces HTTP requests, but be cautious as it may cause conflicts. Test thoroughly after enabling.
Exclude CSS or JS Files
Exclude files critical to your site’s functionality if minification or combination breaks your layout.
Optimize CSS Delivery
Enable this feature to generate critical CSS and defer non-critical styles. This enhances LCP scores.
Load JavaScript Deferred
Defer loading JavaScript files until necessary to improve FID metrics.
Delay JavaScript Execution
Delay the execution of non-critical JavaScript to speed up the initial page load.
The default setting is 10 hours.
There are basic settings. You can minify HTML. This removes whitespace and comments to reduce the size.
The following options are available.
1. Minify HTML
2. Combine Google Fonts files
3. Remove query strings from static resources.
CSS Files
The following options are available.
1. Minify CSS files
2. Combine CSS files (Enable Minify CSS files to select)
3. Optimize CSS delivery.
You can also provide fallback critical CSS.
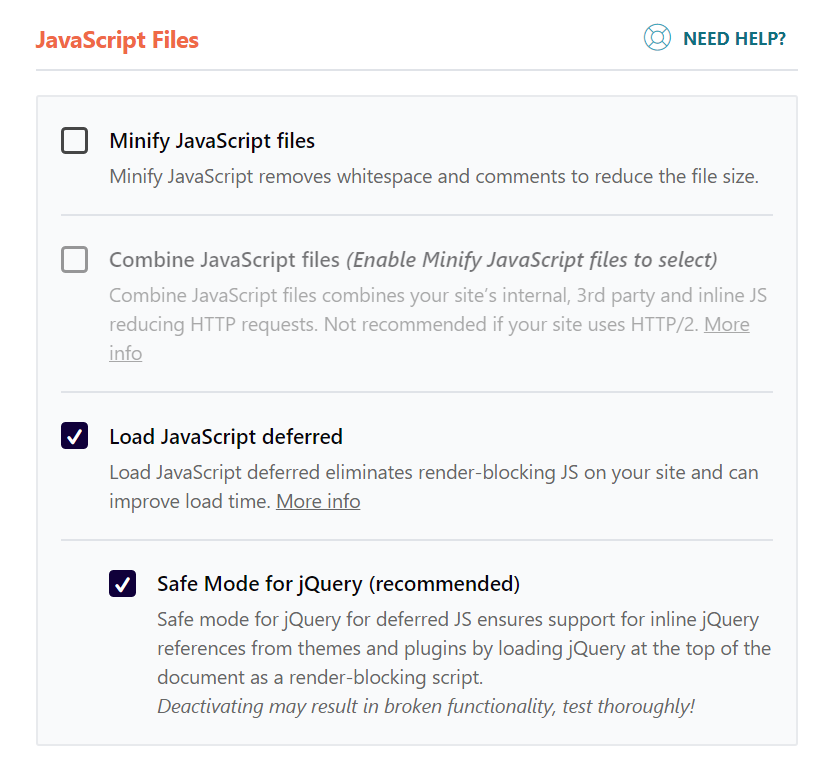
JavaScript Files
1. Minify JavaScript files.
2. Combine JavaScript files (Enable Minify JavaScript files to select).
3. Load JavaScript deferred
a. Safe Mode for jQuery (recommended).
4. Media
Optimizing media files significantly impacts performance.
Lazy Load
Enable lazy loading to defer the loading of images and videos until they are needed, improving initial load times.
Add Missing Image Dimensions
This feature adds width and height attributes to images, helping with CLS improvements.
Enable WebP Caching
If your site serves WebP images, enable caching to deliver these lighter formats efficiently.
LazyLoad
1. Enable for Images
2. Enable for iframes and videos
Emoji
1. Disable Emoji
Embeds
1. Disable WordPress embeds
5. Preload
Preloading improves how quickly content appears to users.
When you enable preloading WP Rocket will generate the cache starting with the links on your homepage followed by the sitemaps you specify. Preloading is automatically triggered when you add or update content and can also be manually triggered from the admin bar or from the WP Rocket Dashboard.
Preload Cache
Automatically generate the cache for pages to ensure faster delivery.
Enable Link Preloading
Preload links when a user hovers over them, reducing load time when they click.
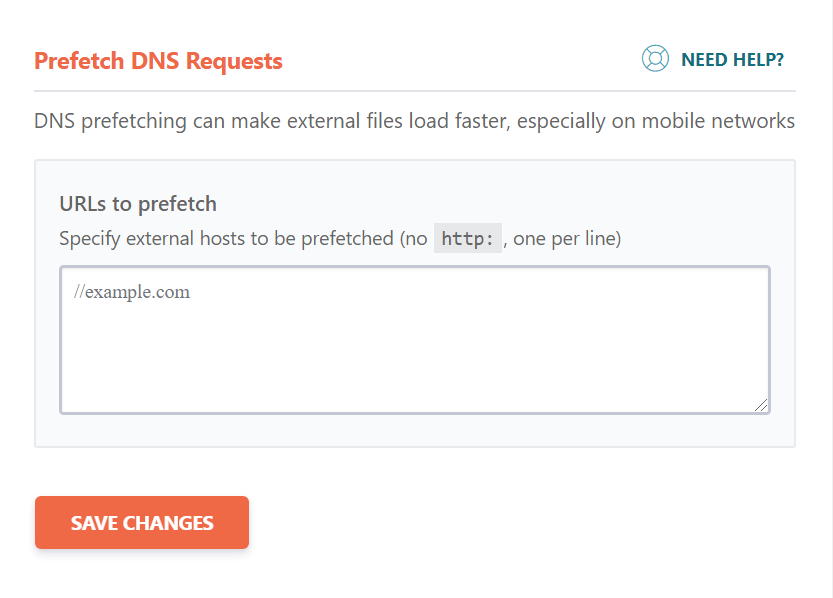
Prefetch DNS Requests
Specify external domains your site depends on (e.g., fonts, analytics) to reduce DNS lookup time.
Preload Fonts
Specify fonts to preload, improving rendering speed and reducing FID.
1. Activate Preloading
a. Activate sitemap-based cache preloading. (The Yoast SEO XML sitemap was automatically detected).
Sitemaps for preloading
Prefetch DNS requests
DNS prefetching can make external files load faster, especially on mobile networks.
6. Advanced Rules
For websites with complex configurations, advanced rules allow you to:
- Exclude specific pages or cookies from caching.
- Enable cache for specific query strings.
These settings are especially useful for eCommerce or membership sites.
1. Never Cache URL(s)
2. Never Cache Cookies
3. Never Cache User Agents(s)
4. Always Purge URL(s).
5. Cache Query String(s).
7. Database
Regular database optimization ensures a clean and fast website.
Post revisions and drafts will be permanently deleted. Do not use this option if you need to retain revisions or drafts.
- Clean Post Revisions: Remove unnecessary drafts.
- Optimize Tables: Reduce overhead in database tables.
- Clear Transients: Remove expired transients to free up space.
Schedule automatic cleanups weekly for consistent performance.
1. Revisions
2. Auto Drafts
3. Trashed Posts
Comments cleanup
1. Spam Comments
2. Trashed Comments
8. CDN
A Content Delivery Network (CDN) ensures faster delivery of assets by serving them from servers closer to the user.
How to Set Up BunnyCDN With WP Rocket
BunnyCDN integrates seamlessly with WP Rocket. Enter your CDN URL in the settings to configure.
Exclude Files From CDN
Exclude files that shouldn’t be served via CDN, such as admin assets.
All URLs of static files (CSS, JS, images) will be rewritten to the CNAME(s) you provide.
Not required for services like Cloudflare and Sucuri. Please see our available Add-ons.
10. Add-Ons
WP Rocket provides add-ons for enhanced functionality.
Varnish
Enable the Varnish add-on if your host uses Varnish caching.
How to Set Up Cloudflare With WP Rocket
Connect WP Rocket with Cloudflare to manage cache and optimize content delivery.
Sucuri
Enable this add-on if you use the Sucuri firewall.
9. Heartbeat
The WordPress Heartbeat API consumes server resources by running periodic calls.
Reducing or disabling the Heartbeat API’s activity can help save some of your server’s resources.
Optimize this setting by:
Reduce or Disable Heartbeat Activity
Limit the API’s frequency or disable it entirely on non-critical areas like post editor autosave.
1. Control Heartbeat.
Reduce or disable Heartbeat activity
Reducing activity will change Heartbeat frequency from one hit each minute to one hit every 2 minutes.
Disabling Heartbeat entirely may break plugins and themes using this API.
10. Add-Ons
WP Rocket provides add-ons for enhanced functionality.
Varnish
Enable the Varnish add-on if your host uses Varnish caching.
How to Set Up Cloudflare With WP Rocket
Connect WP Rocket with Cloudflare to manage cache and optimize content delivery.
Sucuri
Enable this add-on if you use the Sucuri firewall.
1. Google Tracking
Improve browser caching for Google Analytics
WP Rocket will host these Google scripts locally on your server to help satisfy the PageSpeed recommendation for Leverage browser caching.
2. Facebook Pixel
Improve browser caching for Facebook Pixel
WP Rocket will host these Facebook Pixels locally on your server to help satisfy the PageSpeed recommendation for Leverage browser caching.
3. Cloudflare
Integrate your Cloudflare account with this add-on.
Provide your account email, global API key, and domain to use options such as clearing the Cloudflare cache and enabling optimal settings with WP Rocket.
4. Sucuri
Synchronize Sucuri cache with this add-on.
Provide your API key to clear the Sucuri cache when WP Rocket’s cache is cleared.
11. Image Optimization
Image optimization tools like Imagify complement WP Rocket’s features. Compress images and convert them to WebP formats for smaller sizes without quality loss.
You need to install IMAGIFY plugin to complete this optimization process.

12. Tools
WP Rocket includes utility tools such as:
- Export/Import Settings: Save and reuse configurations.
- Rollback: Revert to a previous version if needed.
13. Tutorials
WP Rocket’s website includes detailed tutorials covering various use cases. Utilize these resources to master the plugin’s advanced features.
14. Documentation
Access WP Rocket’s official documentation for in-depth explanations and troubleshooting tips.
Optimal Settings for WP-Rocket + SG Optimizer + Cloudflare
As mentioned before, WP-Rocket itself manages to activate recommended settings based on your configuration. Since there are many parameters like hosting, number and type of plugins, cache plugins used, image optimization plugins etc, one set of settings will not fit all users.
Based upon my research I found that using SG Optimizer and Cloudflare produced the same page loading time results, even though WP-Rocket was used in addition to that.
But there can be plugins conflict and the plugins used by me may be different from yours. So the PageSpeed and Scores will be different from what I get. As per my configuration I used these settings.
- Rocket Tester – Off
- Rocket Analytics – Off
- Mobile Cache – Enable both options
- User Cache – Enabled
- Cache LifeSpan – Default (10 hours)
- Combine Google font files – Checked
- Optimize CSS Delivery – Checked
- Load JavaScript Deferred (alongwith safe mode for jQuery) – Checked
- Active Preloading – Checked
- Sitemap based cache preloading – checked (Yoast XML Sitemap was used)
- Heartbeat – Enabled
- Add-ons – Cloudflare enabled
WP Rocket Best Settings for the Optimal Performance
To summarize, here are the recommended settings for each category:
Cache
- Enable caching for mobile and logged-in users.
- Set a reasonable cache lifespan.
File Optimization
- Minify and combine CSS/JS.
- Delay non-critical JavaScript.
- Optimize CSS delivery.
Media
- Enable lazy load and WebP caching.
Preload Settings
- Activate cache preloading and link preloading.
Advanced Rules
- Use exclusions for specialized use cases.
Database
- Clean up drafts, revisions, and expired transients regularly.
CDN
- Configure BunnyCDN or Cloudflare for optimal performance.
Heartbeat
- Reduce activity or disable entirely to save server resources.
Add-ons Tab
- Enable Varnish, Cloudflare, and Sucuri integrations as needed.
Image Optimization, Tools, and Tutorials Tabs
- Optimize images, utilize tools, and refer to tutorials for maximum results.
Conclusion
Optimizing WP Rocket settings is essential for improving website performance, passing Core Web Vitals, and achieving top rankings on search engines.
By following this guide and tailoring settings to your specific needs, you can ensure a fast, responsive, and user-friendly website.
With the right settings in place, you can create a seamless experience for users, reducing bounce rates and encouraging longer visits.
Make speed a priority, and you’ll not only enjoy the benefits of better SEO, increased traffic, and happier visitors, but also foster a stronger reputation for your brand in the digital landscape!


![W3 Total Cache vs WP Rocket [2025 Comparison] 15 W3 Total Cache vs WP Rocket [2025 Comparison]](https://www.wpreviewtips.com/wp-content/uploads/2025/01/wp-rocket-vs-w3-total-cache-1-768x576.jpg)
