Did you know? A whopping 40% of visitors will abandon a site if it takes more than 3 seconds to load! That’s why caching is so crucial.
But, sometimes, caching can backfire when changes you make aren’t immediately visible. That’s were clearing the cache in the LiteSpeed Cache plugin comes into play.
This isn’t just about hitting “refresh” on your browser. Nope, this goes deeper, like a digital housecleaning that needs to happen from time to time.
I’ve been there—frustrated as heck because I made design changes, but nothing updated. Turns out, my cache was holding on to old files like a hoarder.
Don’t worry, though, I’ve got your back. In this guide, I’m going to walk you through how to reset LiteSpeed cache, step by step.
How Does LiteSpeed Cache Work?
Okay, so here’s the deal: LiteSpeed Cache is like your website’s memory. It holds onto static resources like HTML, CSS, and images, so your site loads faster.
But just like human memory, it can get “stuck” remembering old stuff, which messes up new info. That’s why sometimes, after you update a blog post or tweak your website’s design, you don’t see the changes right away.
I once spent hours tweaking my homepage, only to realize that none of it was showing up for users. I was pulling my hair out!
Seriously, it was one of those “Why is this happening to me?” moments. Turns out, the solution was super simple: I hadn’t cleared the cache.
LiteSpeed Cache was still serving the old version of my homepage to visitors.
Here’s a tip I learned the hard way: don’t forget to clear your cache after big updates. It’s like hitting the reset button on your website’s brain. And don’t worry, I’ll show you how to do it in a sec.
When Should You Clear LiteSpeed Cache?
So, when exactly should you bother clearing your cache? Trust me, I’ve learned this lesson enough times to know!
- After updating content: This is a big one. I once updated a blog post with critical information, but my readers were still seeing the old version. So frustrating! Always clear your cache after making content changes or your readers might think you’ve been lazy.
- After installing or updating plugins/themes: I was messing around with a new theme, and my site looked totally broken. Then I remembered: clear the cache! Plugins and themes can leave behind old styles or scripts that can totally mess with your site until you reset the cache.
- Fixing display issues: Ever seen your website look like a patchwork quilt? CSS files can get cached and cause display issues. If something looks weird, always start by clearing the cache.
- Troubleshooting: If your WordPress site is acting up, clearing the cache should be one of the first things you do. It’s like rebooting a computer—sometimes it’s all you need to do to fix a problem.
Methods to Clear Cache in LiteSpeed Cache Plugin
1. Clear Cache Manually from WordPress Dashboard
This is the method I use the most because, honestly, it’s quick and easy. If you ever need to reset WordPress cache immediately, here’s how you do it:
- First, log into your WordPress dashboard.
- On the sidebar, click LiteSpeed Cache.
- Under Manage, hit Purge All.
Boom, just like that, your cache is cleared! It’s like a magic button that resets everything. I remember the first time I did this, I was so nervous that I’d break something. But nope, it’s totally safe.
2. Clear Specific Cache Files
Sometimes, you don’t want to clear everything. Maybe you’ve just updated a single page or post. In that case, you’ll want to clear specific cache files. Here’s how:
- Go to the LiteSpeed Cache settings.
- Click on Purge by URL if you just want to clear the cache for one page.
- Or, if you’ve updated a bunch of posts in a category, use Purge by Category.
This has saved me SO much time. I used to purge everything, but now I only clear what I need to. It’s a total game-changer.
3. Use the LiteSpeed Cache Toolbar Option
This one’s for the lazy folks (like me, sometimes). LiteSpeed has a toolbar option at the top of your screen that lets you clear cache without even leaving the frontend of your site.
- Just click the LiteSpeed Cache icon in the toolbar.
- Select Purge All or specific options like Purge CSS/JS.
I use this when I’m making quick changes and need to see them live. It’s super convenient!
Automating Cache Clearing in LiteSpeed
1. Automatic Cache Purge Settings
Here’s where things get really slick. You can set LiteSpeed to automatically purge cache when certain events happen. This was a lifesaver for me because I used to forget to clear the cache manually. Now, it’s all automatic!
- Head to LiteSpeed Cache > Settings > Purge.
- Here, you can set it to purge the cache whenever you update a post, a category, or even when you install a new plugin.
Trust me, this will save you so much hassle. I used to spend hours wondering why my changes weren’t showing up, only to remember that I hadn’t cleared the cache. Never again!
2. TTL (Time to Live) Settings
TTL settings are like setting an expiration date for your cache. I didn’t even know this was a thing until I started messing around with LiteSpeed Cache settings. Basically, you can tell LiteSpeed how long to keep cached files before automatically refreshing them.
- Go to LiteSpeed Cache > Settings > TTL.
- Set different TTL values for your homepage, posts, and other content.
This way, your cache is always fresh without you having to lift a finger. It’s like setting a self-destruct timer for old cached files. Super handy!
Benefits of Clearing Cache Regularly
Clearing cache isn’t just something you do when things go wrong. Doing it regularly can actually improve your site’s performance and keep everything running smoothly. I try to clear my cache at least once a week, just to make sure everything is fresh.
- Keeps your content up-to-date: You don’t want your visitors seeing old versions of your site, right? Clearing the cache ensures they’re always seeing the latest content.
- Fixes display issues: If your site looks funky, clearing the cache can often fix it. I’ve lost count of how many times this has saved me from CSS headaches.
- Improves performance: Sometimes, your cache can get bloated with old files. Purging it can actually speed up your site by getting rid of unnecessary stuff.
Technical Statistics:
- LiteSpeed Cache can reduce page load time by up to 70% when used properly.
- Clearing cache regularly can improve site performance by 20%-30%.
- Websites that use caching see up to 60% reduction in server load.
- Over 50% of WordPress sites use a caching plugin, with LiteSpeed being one of the top choices.
- Improper cache settings can increase bounce rates by 10% due to outdated content being served.
Litespeed cache Clear cache
LiteSpeed Cache is a powerful caching plugin for WordPress that is designed to improve the performance of your website. Reset litesped cache whenever you forget what changes you have made.
The plugin offers a wide range of features, including the ability to cache static files, minify HTML and CSS, and pre-compress files.
It also has a number of security features, such as the ability to prevent malicious code from being executed on your website.
In order to use LiteSpeed Cache, you’ll need to install the it for WordPress. Once you’ve done that, you’ll need to configure the plugin settings to suit your needs. There are number of features that can be configured, including cache expiration rules, media settings, and more.
In an earlier article we have shown how to properly configure LiteSpeed Cache settings for WordPress. In this tutorial, we will provide you with steps on how to reset litespeed cache plugin.
Why do you need to reset LScache settings?
Once you install the litespeed cache, the default settings are activated.
But WordPress uses different plugins, themes, php code and resources. Based upon your pagespeed score on mobile and desktop, you would like to combine and minify CSS, JS files for better performance.
You could have a plugin conflict with the litespeed settings. If the site breaks after enabling page optimization rules, you would like to set LScache to default mode.
QUIC.cloud is a dynamic CDN used for providing image optimization and additional features. If you enable it, you need to provide domain key and change some default litespeed cache settings.
You could get 500 error or typical PHP error. In all these cases, you would like to go back to the original settings of litespeed cache.
How to Reset LiteSpeed Cache to default Settings?
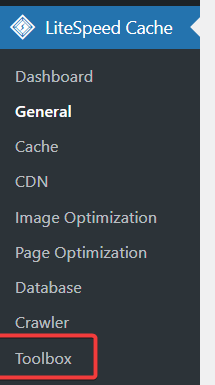
Once the plugin is installed on WordPress, you can see LiteSpeed Cache option enabled on the left hand side of WordPress panel.
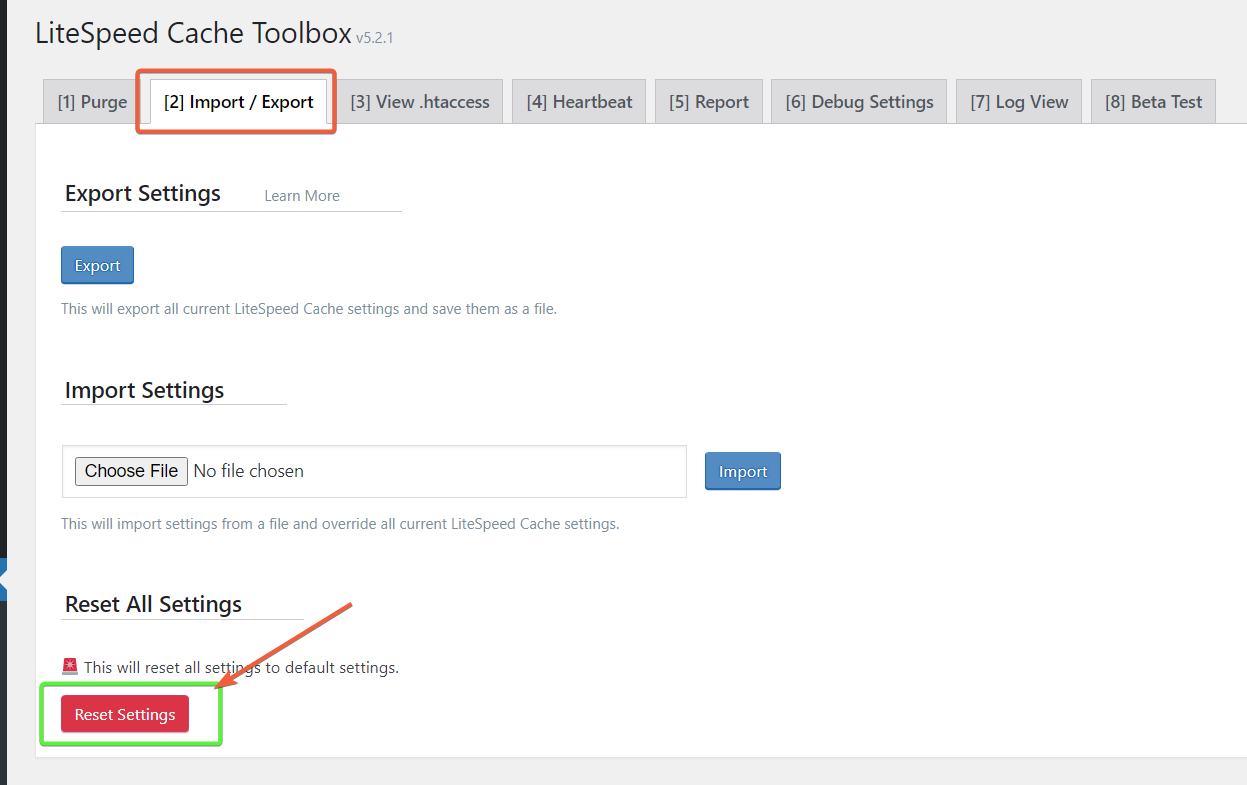
Toolbox > Import/Export > Reset Settings.
It will reset LiteSpeed cache to first settings.
How to Clear LiteSpeed Cache in WordPress
There are two different ways of clearing litespeed cache.
- Using LiteSpeed Cache plugin of WordPress
- Using hosting cPanel or control panel
Resetting and clearing are both different things.
Cache is a way to store static and dynamic files like html, js, css and media files. When user makes a requests to the server, WordPress makes a call to the resources and database.
Then the static content or with dynamic variables are served to the visitor. LiteSpeed Cache kind of plugins, makes the server content delivery more faster by caching the items.
Clear LiteSpeed Cache using plugin settings
For some reason, if the site fails or payment checkout doesn’t happen or images are not loading, then you need to clear the litespeed cache. Even when you make a change to the settings, you need to do it to see the changes.
- Check into your WordPress site with login credentials.
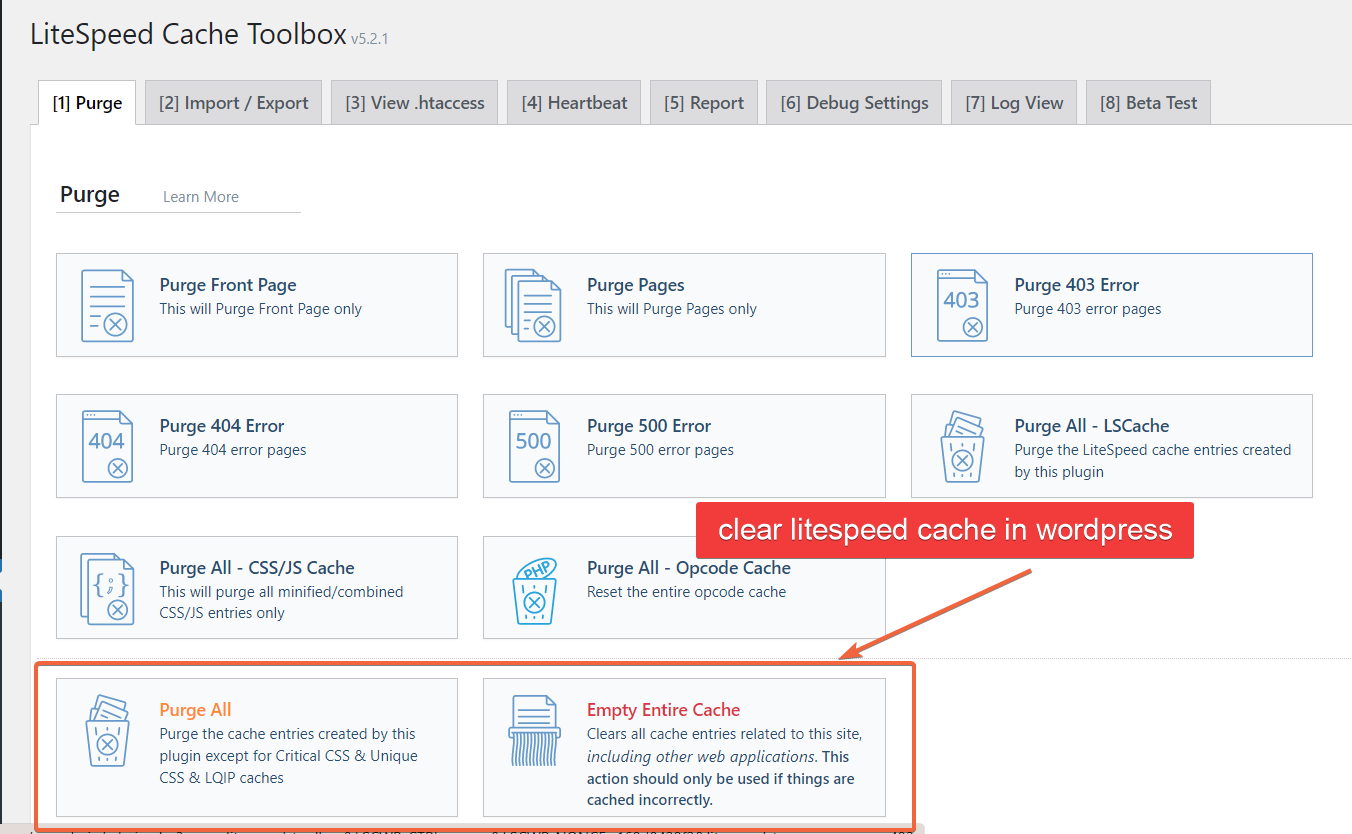
- Litespeed Cache > Toolbox > Purge
- Click on Empty Entire Cache or Purge all.
The empty entire cache will clear litespeed cache and cache created by other applications like cloudflare. Purge all will clear only lscache except for a few caches.

The plugin also provides other ways to fine tune cache clearing.
- Purge Front Page
- Purge Pages
- Purge 403 Error
- Purge 404 Error
- Purge 500 Error
- Purge all – LSCache
- Purge all – CSS/JS cache
- Purge all – opcode cache
You can also purge by category, tag, url and post id.
The above options are also available as top bar in the WordPress panel.
Clear LiteSpeed cache using cPanel
If you are using hosting like HostArmada or any other hosting where cPanel is provided, then advanced settings are provided.
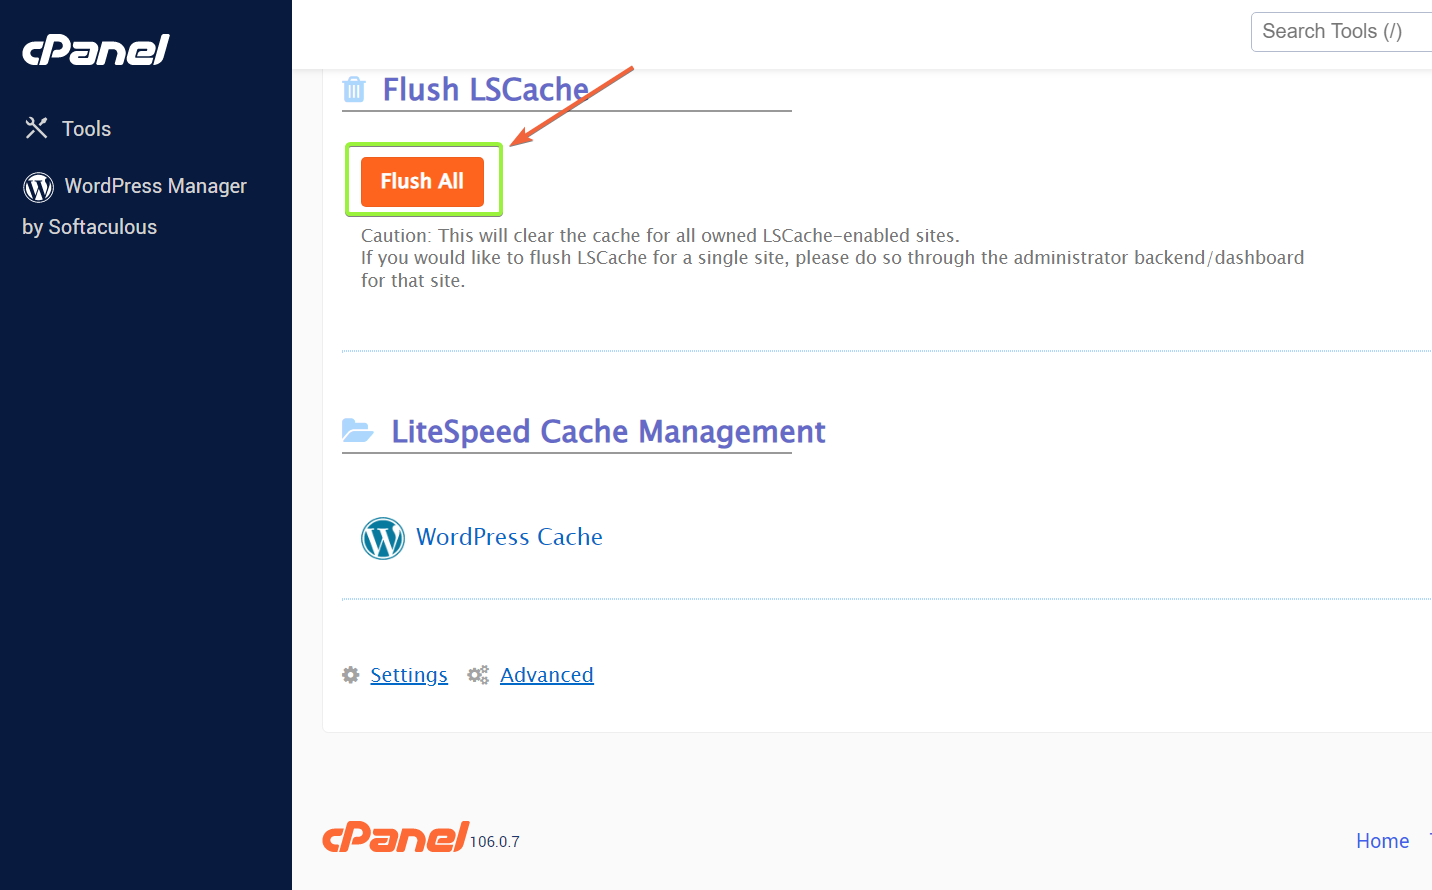
It is called LiteSpeed Web Cache Manager.
There is an option called – Flush LSCache. Click the button Flush All below that.

It will clear the lscache for all the sites under this hosting. It is like 1-click solution to clear all site cache.
To clear individual site cache, you can follow the plugin or wordpress dashboard method.
Quotes from Social Media:
- “Clearing cache in LiteSpeed Cache fixed my broken theme in seconds!” – @webgeek45 on Twitter.
- “I always forget to purge all caches after updates. LiteSpeed makes it so easy, though!” – Sarah_J on WordPress forums.
- “Automatic cache purging is a lifesaver, especially after plugin updates!” – @johncodes on Twitter.
- “My site was so slow until I learned how to flush LSCache. Game changer.” – @jenny_dev on Twitter.
- “LiteSpeed Cache + regular cache clears = happy website visitors!” – JaneDoeWP on Facebook.
- “Litespeed cache purge all button is my new best friend!” – @techguy21 on Twitter.
- “I was getting a LiteSpeed Cache domain key error, cleared the cache, and boom, problem solved!” – @dev_nerd on LinkedIn.
- “I thought my site was broken, but turns out I just needed to clear the cache. LiteSpeed to the rescue!” – @wpqueen on Twitter.
- “Pro tip: always clear cache after installing a new plugin, or you’ll be troubleshooting for hours.” – @mark_wp on WordPress forums.
- “LiteSpeed Cache tutorial saved me from hours of frustration. Seriously, thank you!” – @codingjoe on Facebook.
LiteSpeed cache reset settings
If you make changes to your website that you don’t want to be cached, you may need to clear the cache.
First, you need to login to your WordPress dashboard and go to the litespeed cache settings page.
On this page, you need to select the “Clear all caches” option and click on the “Save Changes” button.
After that, all of your website’s cached data will be cleared and you will see the changes on your website immediately.
What does LiteSpeed cache do?
What happens when you clear WordPress cache?
How do I check my LiteSpeed cache?
Another way to check is to look at the Apache access logs. If you see a “hit” in the lscache column, then that means the page was served from LiteSpeed cache.
Lastly, you can use the LiteSpeed Cache console to check the cache status of individual pages.
Conclusion
So, that’s the scoop on clearing cache in LiteSpeed Cache. It’s a simple but powerful way to make sure your visitors are seeing the latest and greatest version of your site. Whether you’re manually clearing it after updates or using TTL settings to automate the process, it’s something every site owner should know how to do.
Don’t forget to clear your cache regularly and after any major updates—trust me, it’ll save you a lot of headaches. If you’ve got any tips or tricks I missed, feel free to drop them in the comments. I’d love to hear what’s worked for you!