We need best LiteSpeed cache settings for ideal performance of WordPress site. If you don’t optimize the settings, the plugin can slow down instead of improving speed.
Only an experienced web developer who has good experience with cache plugins can install the right configuration. We made it easy for beginners of WordPress to use the best settings for LiteSpeed cache plugin.
Litespeed Cache is a WordPress caching plugin that is known for its speed and performance. It is a popular choice among WordPress users because it is easy to use and it offers a lot of features.
Some settings become resource intensive and some may break down the site if not configured properly. But I found that using QUIC.cloud with the correct settings of the LiteSpeed Cache plugin can improve the core web vitals and UX of the site.
In our LiteSpeed Cache review, we have mentioned the features, benefits, speed test results of using both the plugin and QUIC.cloud CDN. In this post you are going to learn the litespeed best settings to make your site better.
WordPress LiteSpeed Cache
If you are using WooCommerce, then you should consider using Litespeed Cache.
It has a special setting for WooCommerce that can speed up your website.
When right settings are turned on, you can see the benefits. You do not need any code to figure out the settings.
They are all obvious. Only thing is you should know which one to set on and off.
Also different hosting services don’t have LiteSpeed Server. In that case, you need to use an alternative or QUIC.cloud.
Default Settings
When you install and activate the cache plugin it comes with some predefined settings. You can keep them as it is and test your speed scores on test tools like GTMetrix, PageSpeed Insights, WebPageTest etc.
If you are satisfied with the results, speed and core web vitals, then you can use them without changing any other settings. But some hosting services servers break or not improve the site speed based on these settings. In that case you need to make some changes to these settings.
When setting up LiteSpeed Cache, it’s essential to configure the LiteSpeed Cache WordPress settings for optimal performance. Start by enabling the cache and setting an appropriate TTL (Time to Live) value. Next, configure the LiteSpeed Cache database optimization options to minimize database queries and improve overall efficiency. This includes enabling object caching and setting a reasonable expiration time.
To further enhance your website’s speed, consider integrating a LiteSpeed Cache CDN (Content Delivery Network). This will serve your static content from multiple global locations, reducing latency and improving load times for visitors worldwide.
Another crucial aspect of LiteSpeed Cache setup is managing the WordPress heartbeat API. By default, the heartbeat API can generate numerous requests, causing unnecessary server load. LiteSpeed Cache heartbeat settings allow you to control the frequency of these requests or disable them entirely for specific pages, such as the dashboard or post editor.
LiteSpeed Cache image optimization is another powerful feature that can significantly reduce page load times. By enabling image optimization, LiteSpeed Cache will automatically compress and resize images, ensuring they are served in the most efficient format and size for each visitor’s device. This not only improves performance but also saves bandwidth.
To achieve the best results, regularly monitor your website’s performance using tools like GTmetrix or Google PageSpeed Insights. These tools will provide valuable insights and suggestions for further optimizing your LiteSpeed Cache WordPress settings, ensuring that your website remains fast, responsive, and user-friendly.
LiteSpeed Cache Best Settings
When it comes to caching, LiteSpeed offers multiple options to configure. You can find the LiteSpeed Cache settings page under “Performance -> LiteSpeed Cache” in your WordPress admin area. In this article, we will cover the best LiteSpeed Cache settings for WordPress.
The first setting you need to configure is “EnableCache“. This setting enables the caching functionality on your WordPress website. We recommend that you enable this setting for better performance.
The next setting is “CachePrivacyMode“. This setting determines who can see the cached version of your website. If you set this setting to “Private“, only logged-in users will be able to see the cached version of your website. If you set it to “Public“, anyone will be able to see the cached version of your website. We recommend that you set this setting to “Public” for better performance.
LiteSpeed Cache Configuration
The next setting is “BrowserCacheTTL“. This setting determines how long the browser should cache static resources on your WordPress website. We recommend that you set this setting to a value of “3600” for better performance.
The next setting is ” CrawlerIpAccess“. This setting allows you to specify which IP addresses can access the cached version of your website. We recommend that you set this setting to “*” for better performance.
The next setting is “EntityTagHeader“. This setting allows you to specify whether or not ETags should be used on your WordPress website. We recommend that you enable this setting for better performance.
The final setting is “ExpiryType“. This setting allows you to specify how long cached pages and objects should be expired on your WordPress website. We recommend that you set this setting to “TIME_IN_SECS“.
Once you have configured these settings, click on the “Save Changes” button at the bottom of the page to save your changes.
LiteSpeed Best Settings
There are a few things you need to know before diving into the best settings for LiteSpeed Cache. The first is that LiteSpeed Cache is a server-level caching solution. This means that it’s installed on your web server and then activated for your WordPress site. The second is that because it’s a server-level caching solution, it’s incredibly fast. In fact, LiteSpeed Cache is one of the fastest caching solutions available.
When it comes to the best settings for LiteSpeed Cache, there are a few general guidelines you should follow:
1. Use LSCache for All Your Sites
2. Use LSCache with WordPress Shared Hosting
3. Use LSCache with WordPress Dedicated / VPS Hosting
4. Use LSCache with WordPress Multi-Site (Network)
5. Use LSCache with WordPress eCommerce Sites
6. Use LSCache with Static HTML Sites
7. General Guidelines for Using LSCache
LiteSpeed Cache setup
Litespeed’s cache plugin is one of the easiest to use and configure. We’ll go over the basics of setting it up for maximum speed and performance.
First, you’ll need to install and activate the plugin. Then, go to Settings > LiteSpeed Cache and click on the General tab.
In the General tab, you’ll want to check the following settings:
–Enable cache: This will turn on caching for your website.
–Cache TTL: This is how long Litespeed will keep cached files before refreshing them. The TTL can be set in seconds, minutes, hours, or days. We recommend setting it to 1 hour for most websites.
–Public Cache: This setting controls whether non-logged in users will see cached versions of your pages or not. If you’re not sure what to choose, we recommend checking this box.
–Private Cache: This setting controls whether logged in users will see cached versions of your pages or not. If you’re not sure what to choose, we recommend checking this box.
– feed cache: This setting controls whether RSS feed items will be cached or not. If you’re not sure what to choose, we recommend checking this box.
–Enable Static Files: This setting allows Litespeed to serve static files (like CSS and JS) from its cache. We recommend checking this box.
–Enable Browser Cache: This setting allows visitors’ browsers to cache static files from your website. We recommend checking this box.
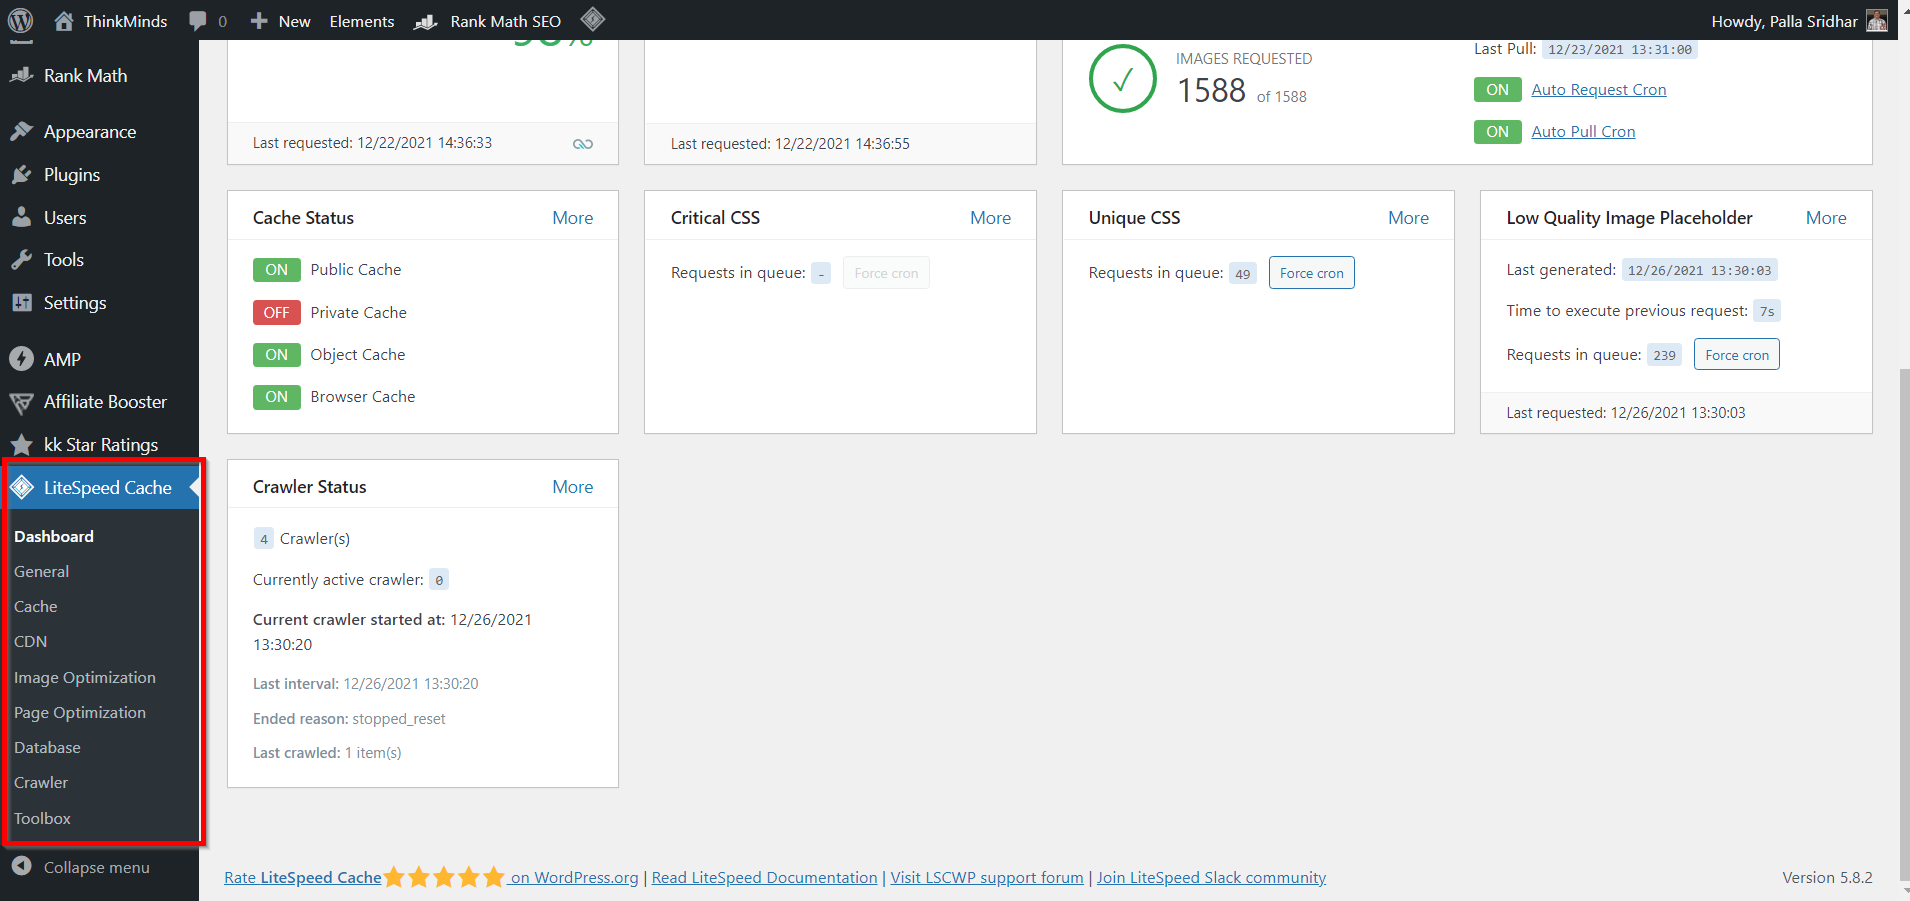
General Settings
- General
- Cache
- CDN
- Image Optimization
- Page Optimization
- Database
- Crawler
- Toolbox
Each of these basic settings will have sub-settings to improve your speed score. Some settings work out for all site users, hosting service and CDN. But for some, you need to test yourself if it works out correctly.
This may sometimes take time in clearing the cache, testing the speed and UX tools and then switching off the settings. Whenever you are in doubt, leave the default settings.
General
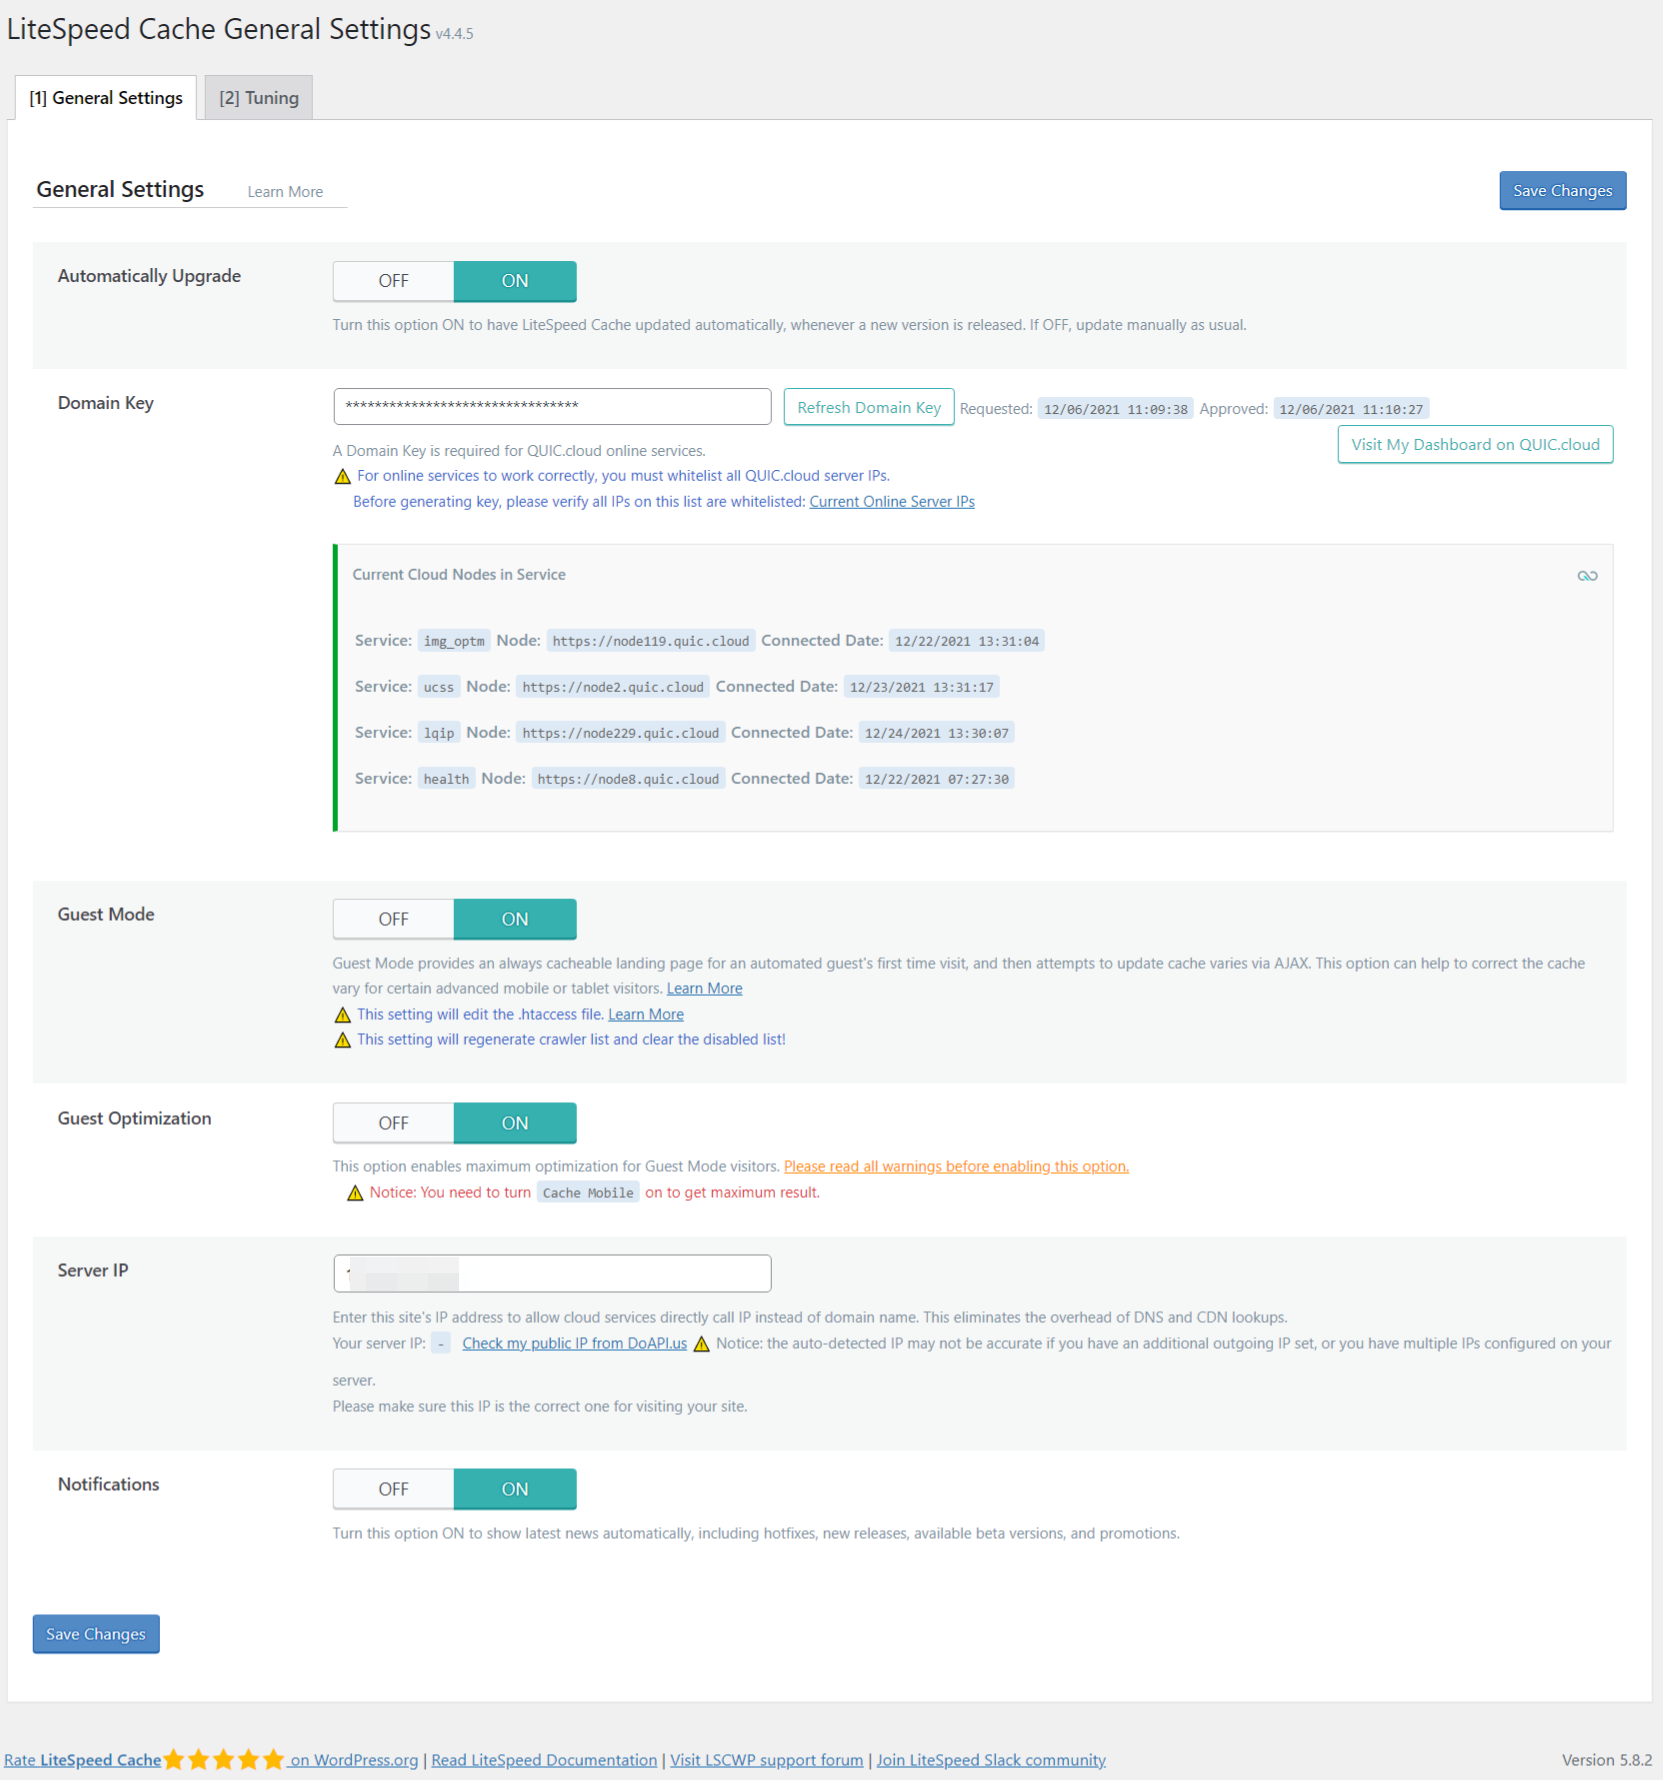
General Settings
- Automatically Upgrade – ON
- Domain Key – Click the button to request a Domain Key for free. Using this key link to the QUIC.cloud CDN online service.
- Guest Mode – ON
- Guest Optimization – ON
- Server IP – Get these details from your domain registrar or hosting service.
- Notifications – ON
Tuning
- Guest Mode User Agents
- Guest Mode IPs
Leave the default settings.
Cache
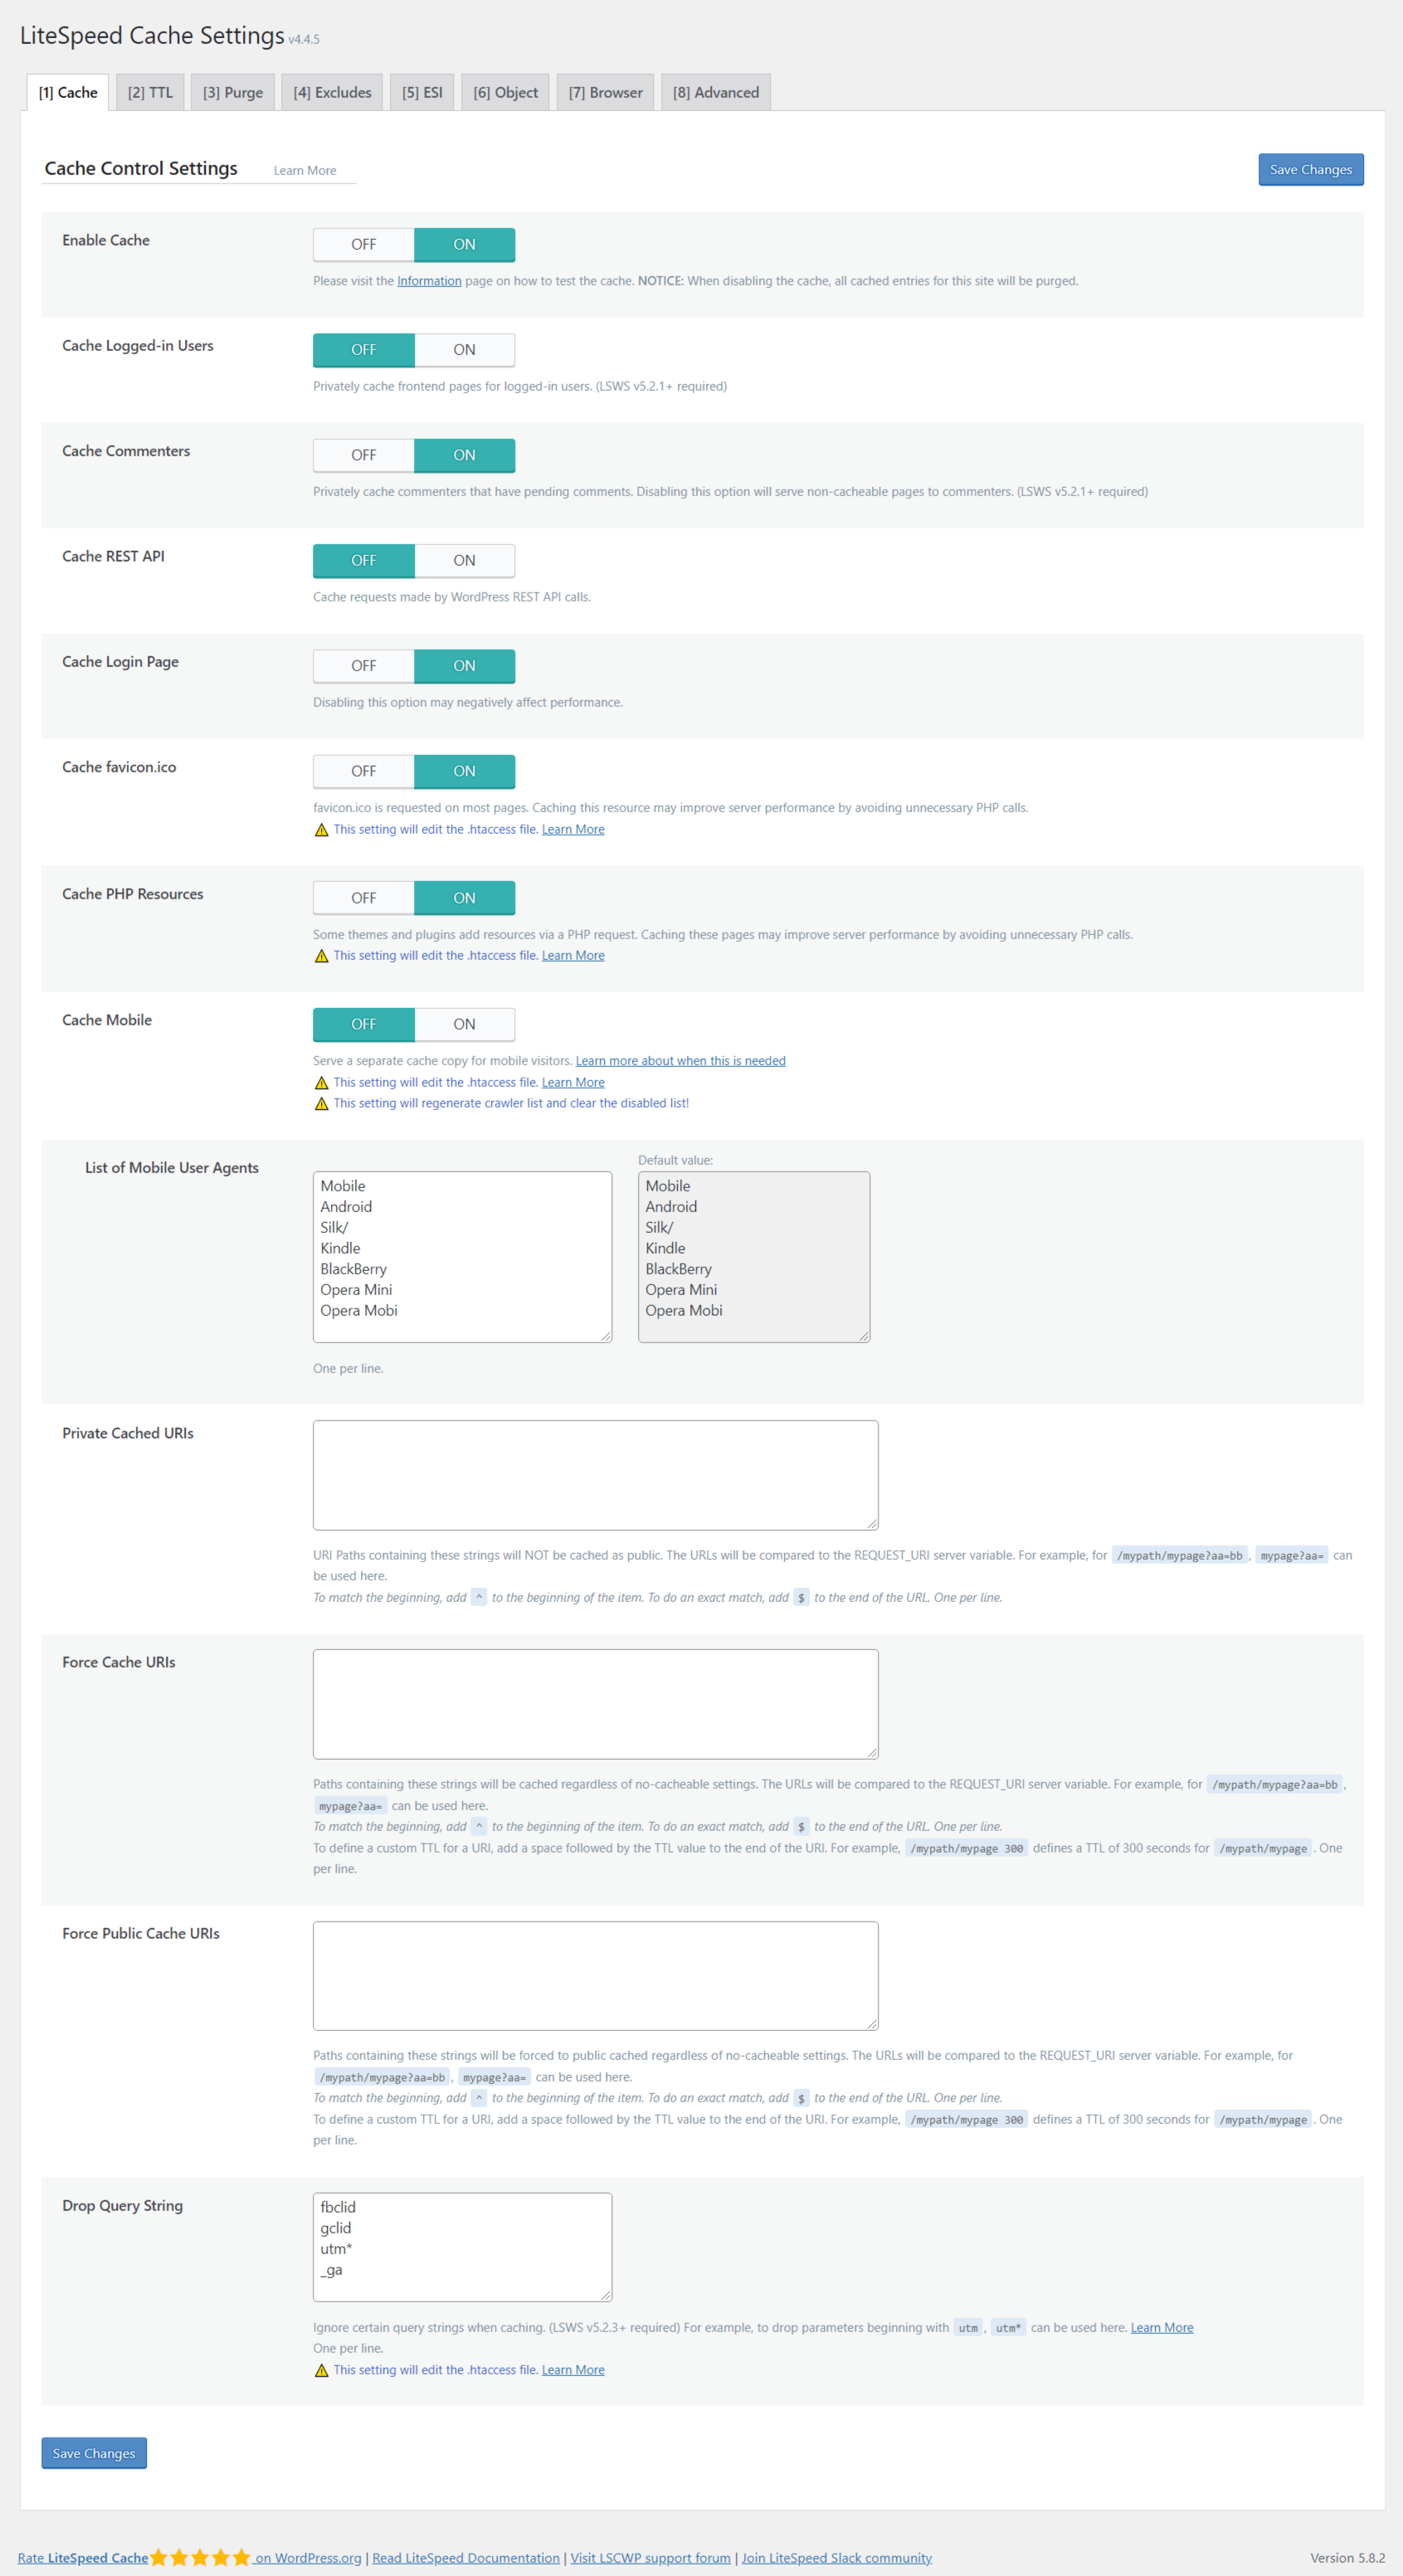
Cache Control Settings
- Enable Cache – ON
- Cache-Logged In Users – OFF
- … Commenters – OFF
- Cache REST API – ON
- Cache Login Page – ON
- .. PHP Resources – ON
- Cache Mobile – Varies. If you are using AMP pages, turn it OFF. Otherwise, if not using any other mobile cache, then turn it ON.
- List of Mobile User Agents
- Private Cached URLs – Default
- Force Cache URLs – Default
- Force Public Cache URLs – Default
- Drop Query String – ON
TTL
- Default Public Cache TTL
- Default Private Cache TTL
- … Front Page TTL
- Default Feed TTL
- Default REST TTL
- …. HTTP Status Code Page TTL
Leave the default settings.
Purge Settings
- Purge All on Upgrade
- Auto Purge Rules for Publish/Update
- Serve Stale
- Scheduled Purge URLs
- Schedule Purge Time
- ,,, All Hooks
Leave the default settings.
Excludes
- Do Not Cache URIs
- Do Not Cache Query Strings
- … Cache Categories
- Do Not Cache Tags
- … Cache Cookies
- Do Not Cache User Agents
- Do Not Cache Roles
Leave default settings.
ESI Settings
- Enable ESI – Depends
- Cache Admin Bar
- Cache Comment Form
- ESI Nonces
- Vary Group
If you want the WordPress Dashboard operations to be quick, you can set this to ON. Even then, if there is no change, then you can turn it OFF. Most of the time it is used for dynamic pages to break little blocks and load them when necessary.
Object Cache Settings
- Object Cache – ON
- Method – Depends on your hosting server. Generally, MemCache is supported by most of the hosting services. If Redis is supported, you can enable it from the Control Panel or Dashboard of the hosting server settings.
- Host
- Port
- Default Object Lifetime
- Username
- Password
- Redis Database ID
- Global Groups
- Do Not Cache Groups
- Persistent Connection – ON
- Cache WP-Admin – OFF
- Store Transients – ON
Leave other settings to the installation default settings.
Browser Cache Settings
- Browser Cache – ON
- .. TTL – 31557600
Advanced Settings
- Login Cookie – Default
- Improve HTTP/HTTPS Compatibility – ON. If you are not using any other CDN or cache system to enable this setting, then you can turn it ON. Some third-party resources on your site are HTTP. So even if you have an HTTPS certificate installed, modern browsers will still show a warning. This setting will rectify that.
- Instant Click – ON
CDN
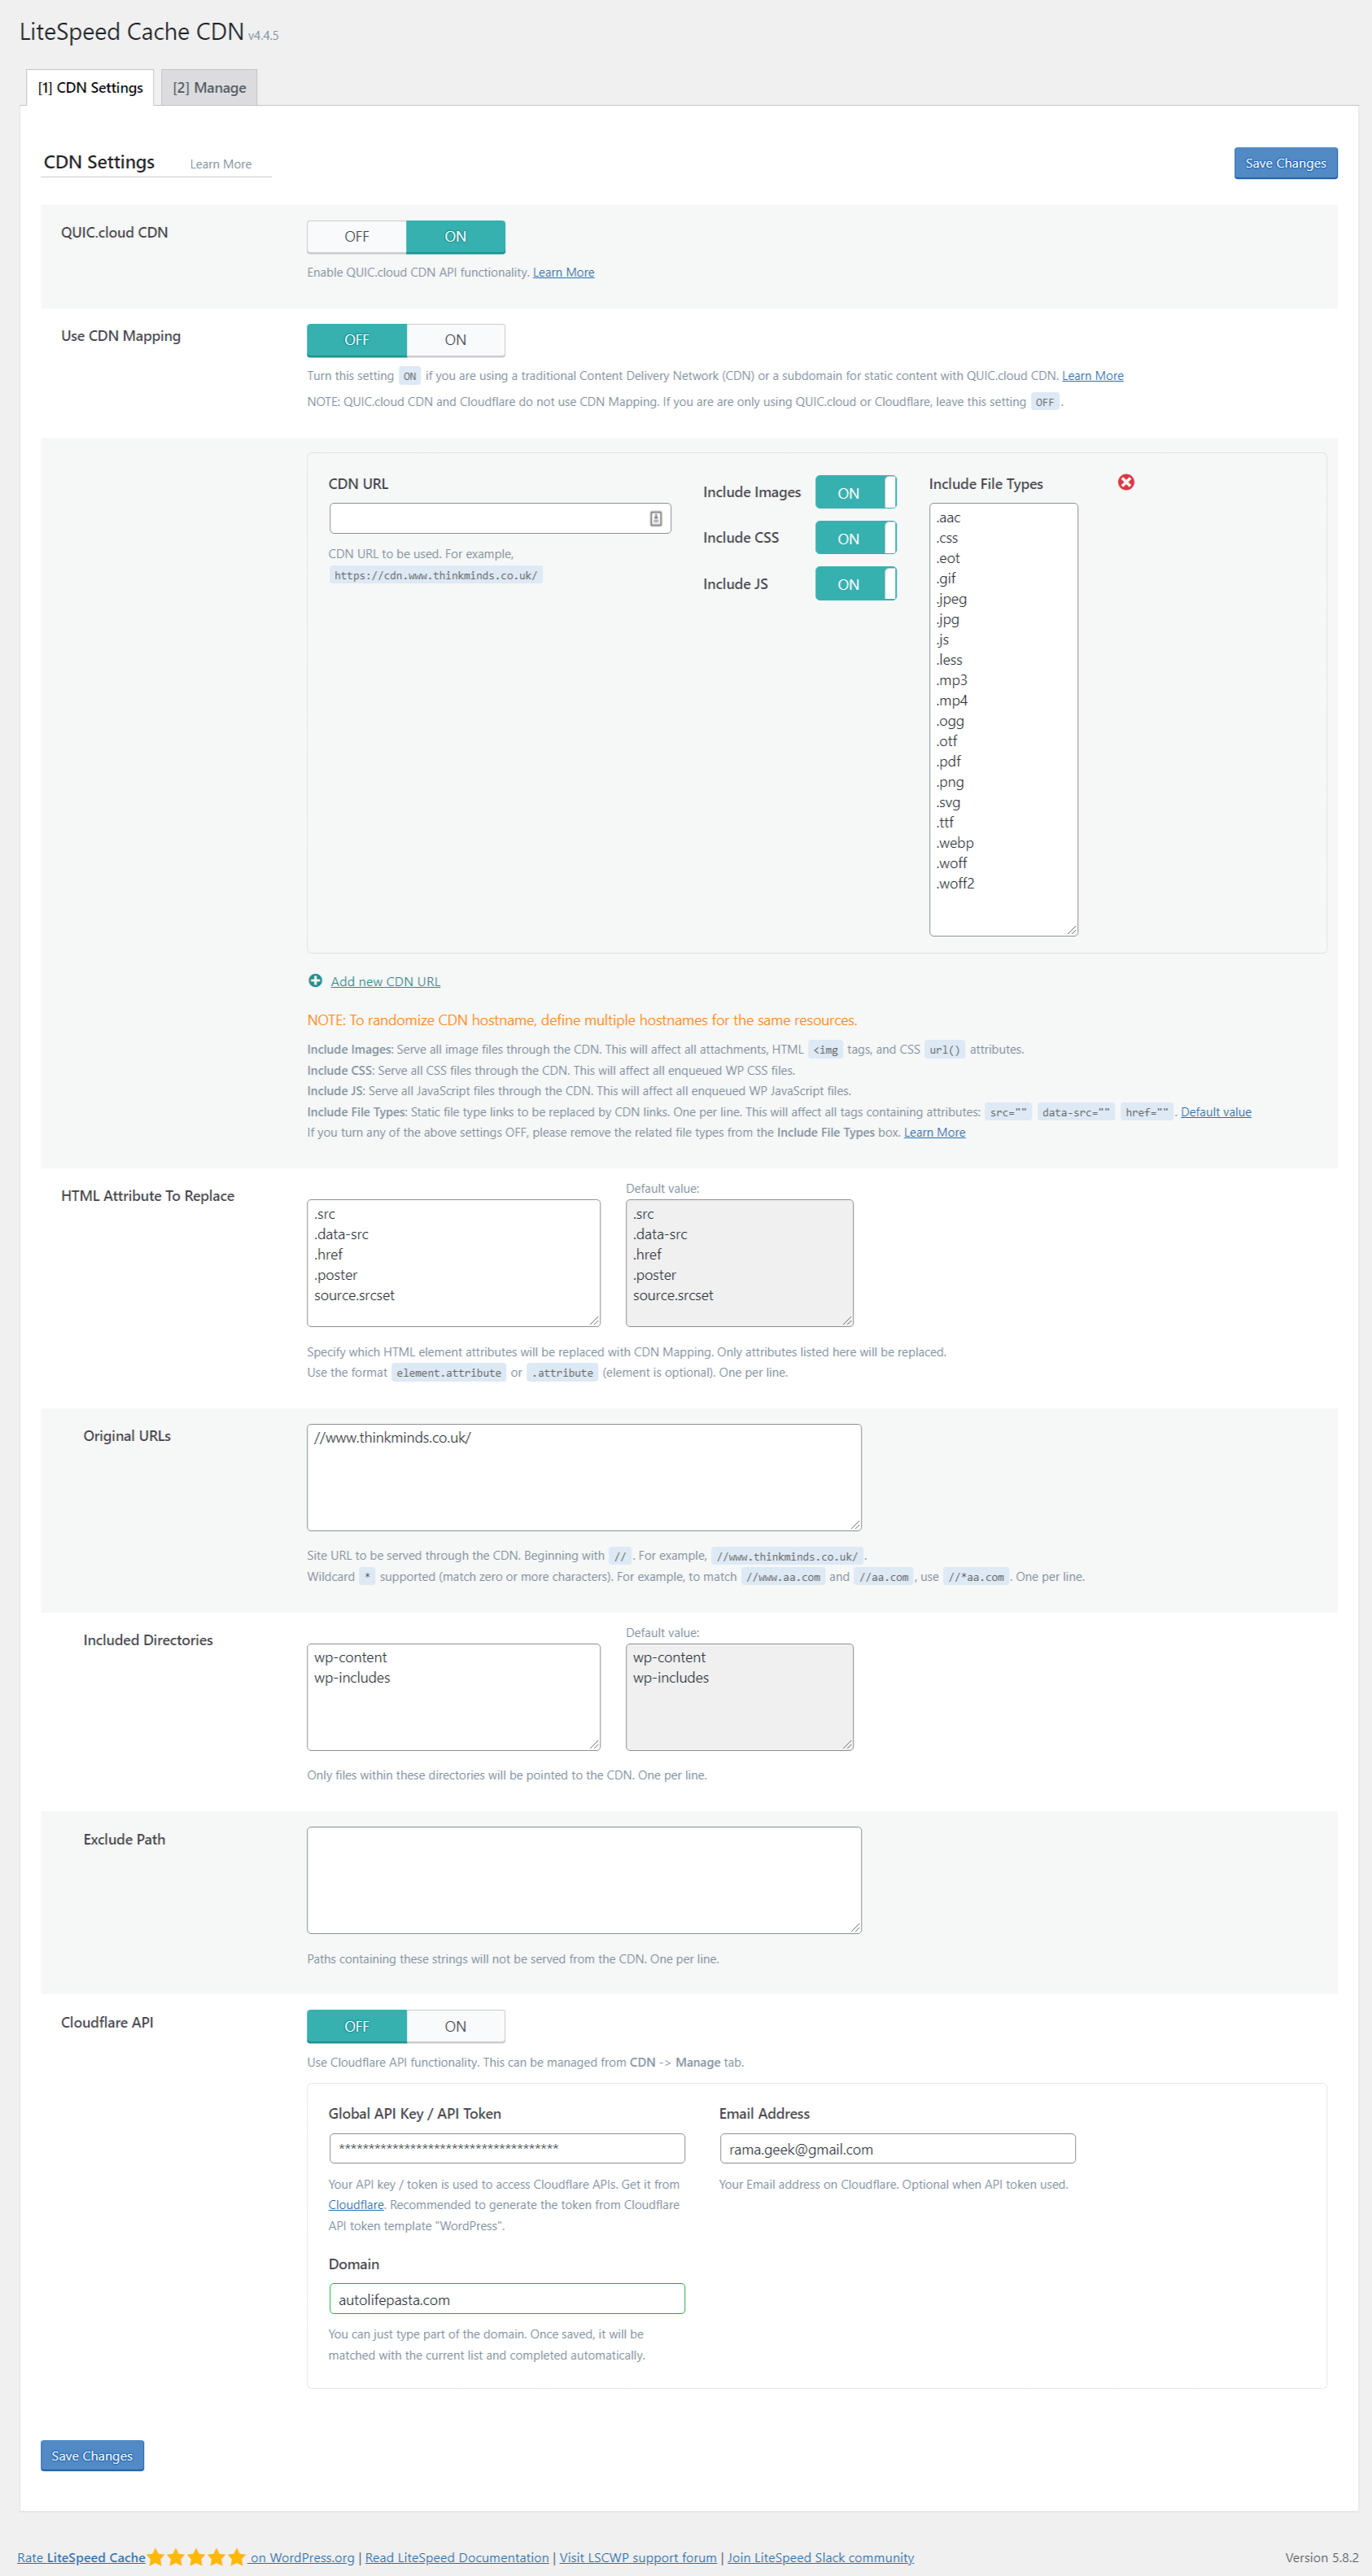
CDN Settings
- QUIC.cloud CDN – ON. First you need to activate the domain key in the earlier steps to make use of this CDN.
- Use CDN Mapping – OFF
- HTML Attribute To Replace
- Original URLs
- Included Directories
- Exclude Path
- Cloudflare API – OFF, if you are using QUIC.cloud. Otherwise turn it on and enter the API credentials of your Cloudflare account. You can use either QUIC.cloud and Cloudflare accounts. Not both. Free account is possible with Cloudflare.
Manage
- QUIC.cloud
- Cloudflare
Based on the above settings.
Image Optimization
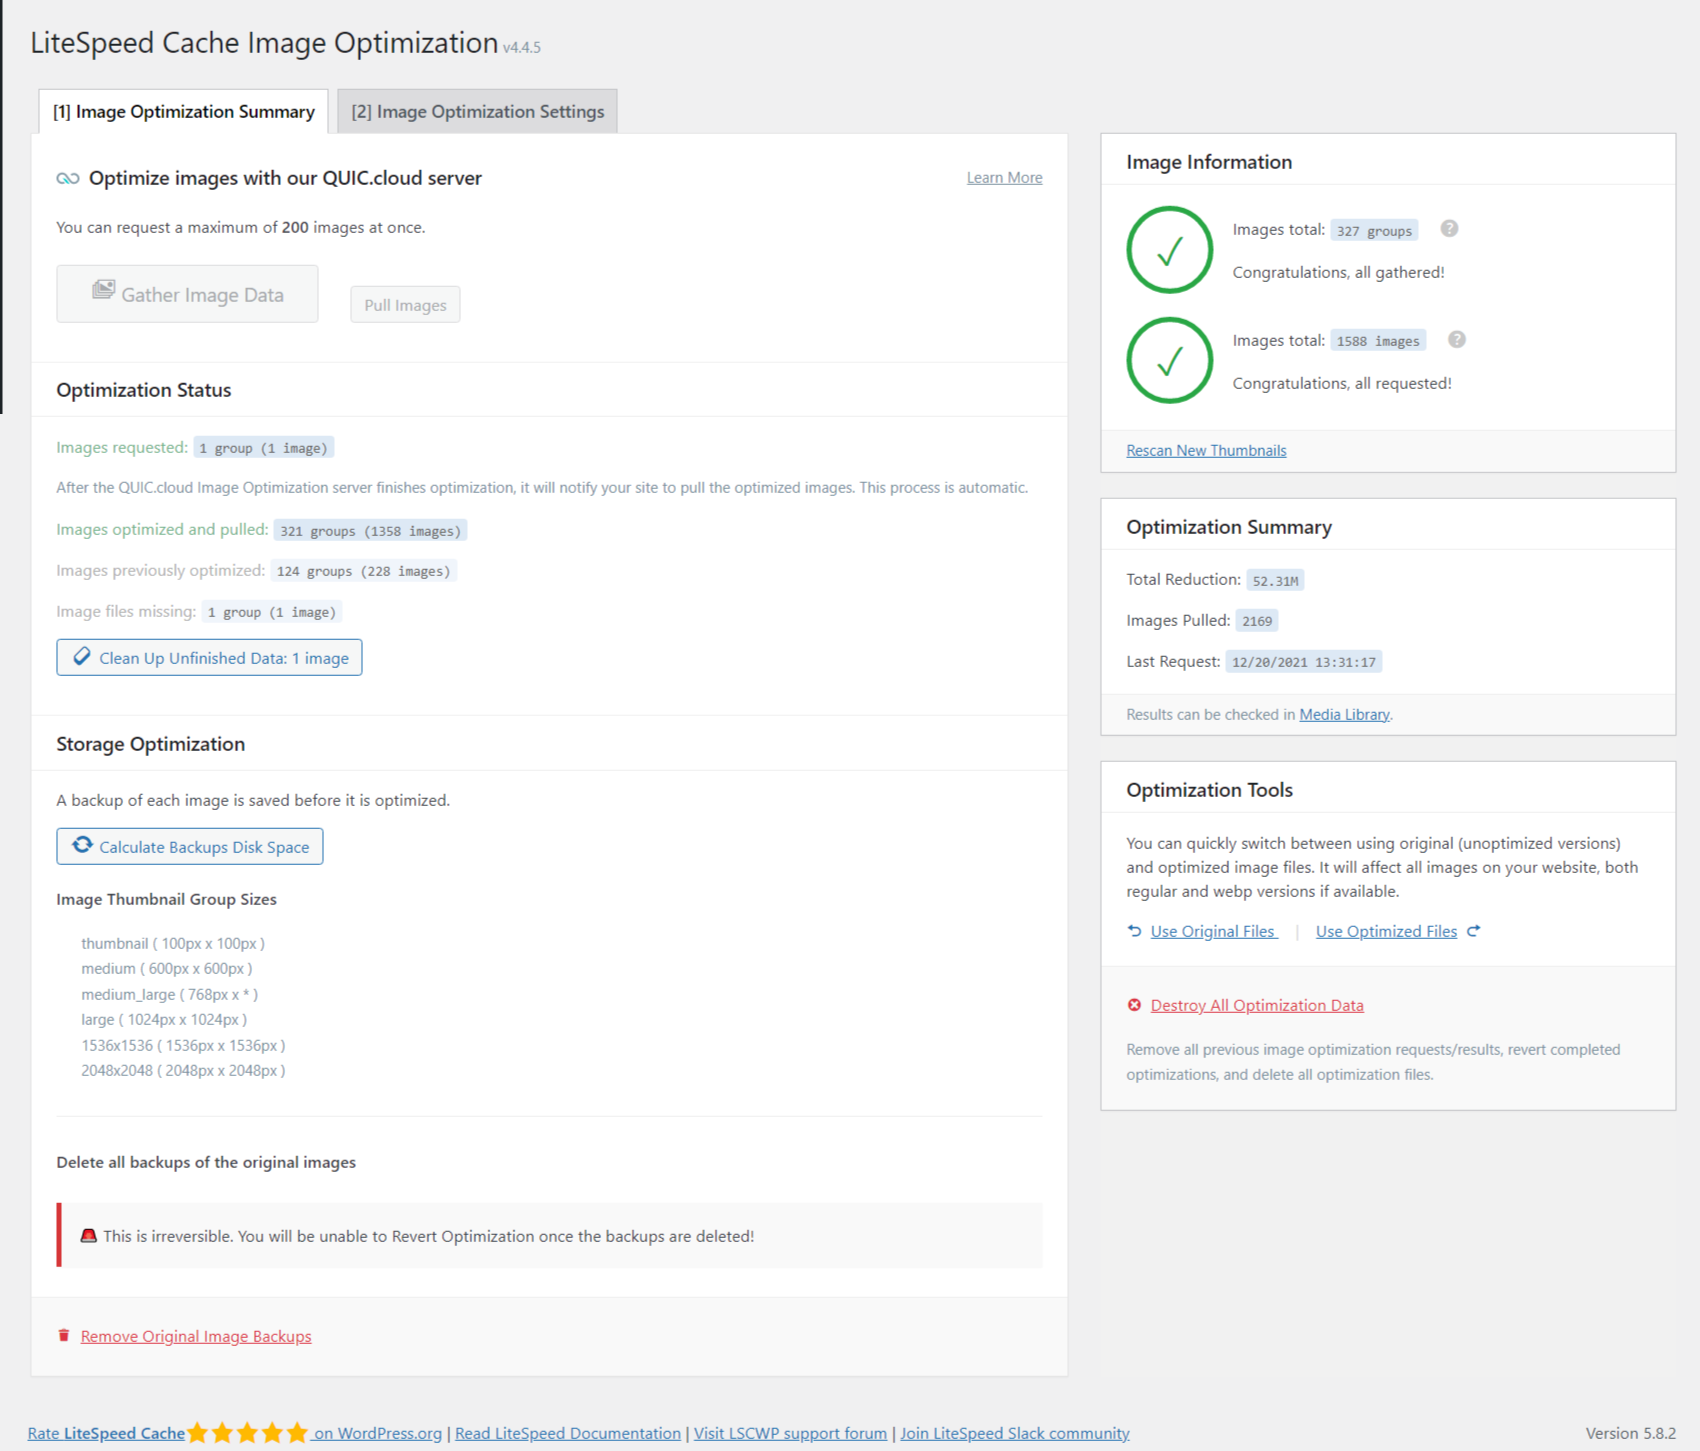
Image Optimization Summary
- Optimize images with our QUIC.cloud server
- Optimization Status
- Storage Optimization
Image Optimization Settings
- Auto Request Cron – ON
- Auto Pull Cron – ON
- Optimize Original Images – ON
- Remove Original Backups – OFF. Be careful with this setting. If you turn it ON, the original images will be removed and will be replaced with the optimized images. In case, you want to revert back to the original ones, it will not be possible. For best backup measures, always keep it OFF.
- Optimize Losslessly – ON
- Preserve EXIF/XMP data – OFF
- Create WebP Versions – ON
- Image WebP Replacement – ON
- WebP Attribute To Replace – Default
- WebP For Extra srcset – ON
- WordPress Image Quality Control – Default
Page Optimization
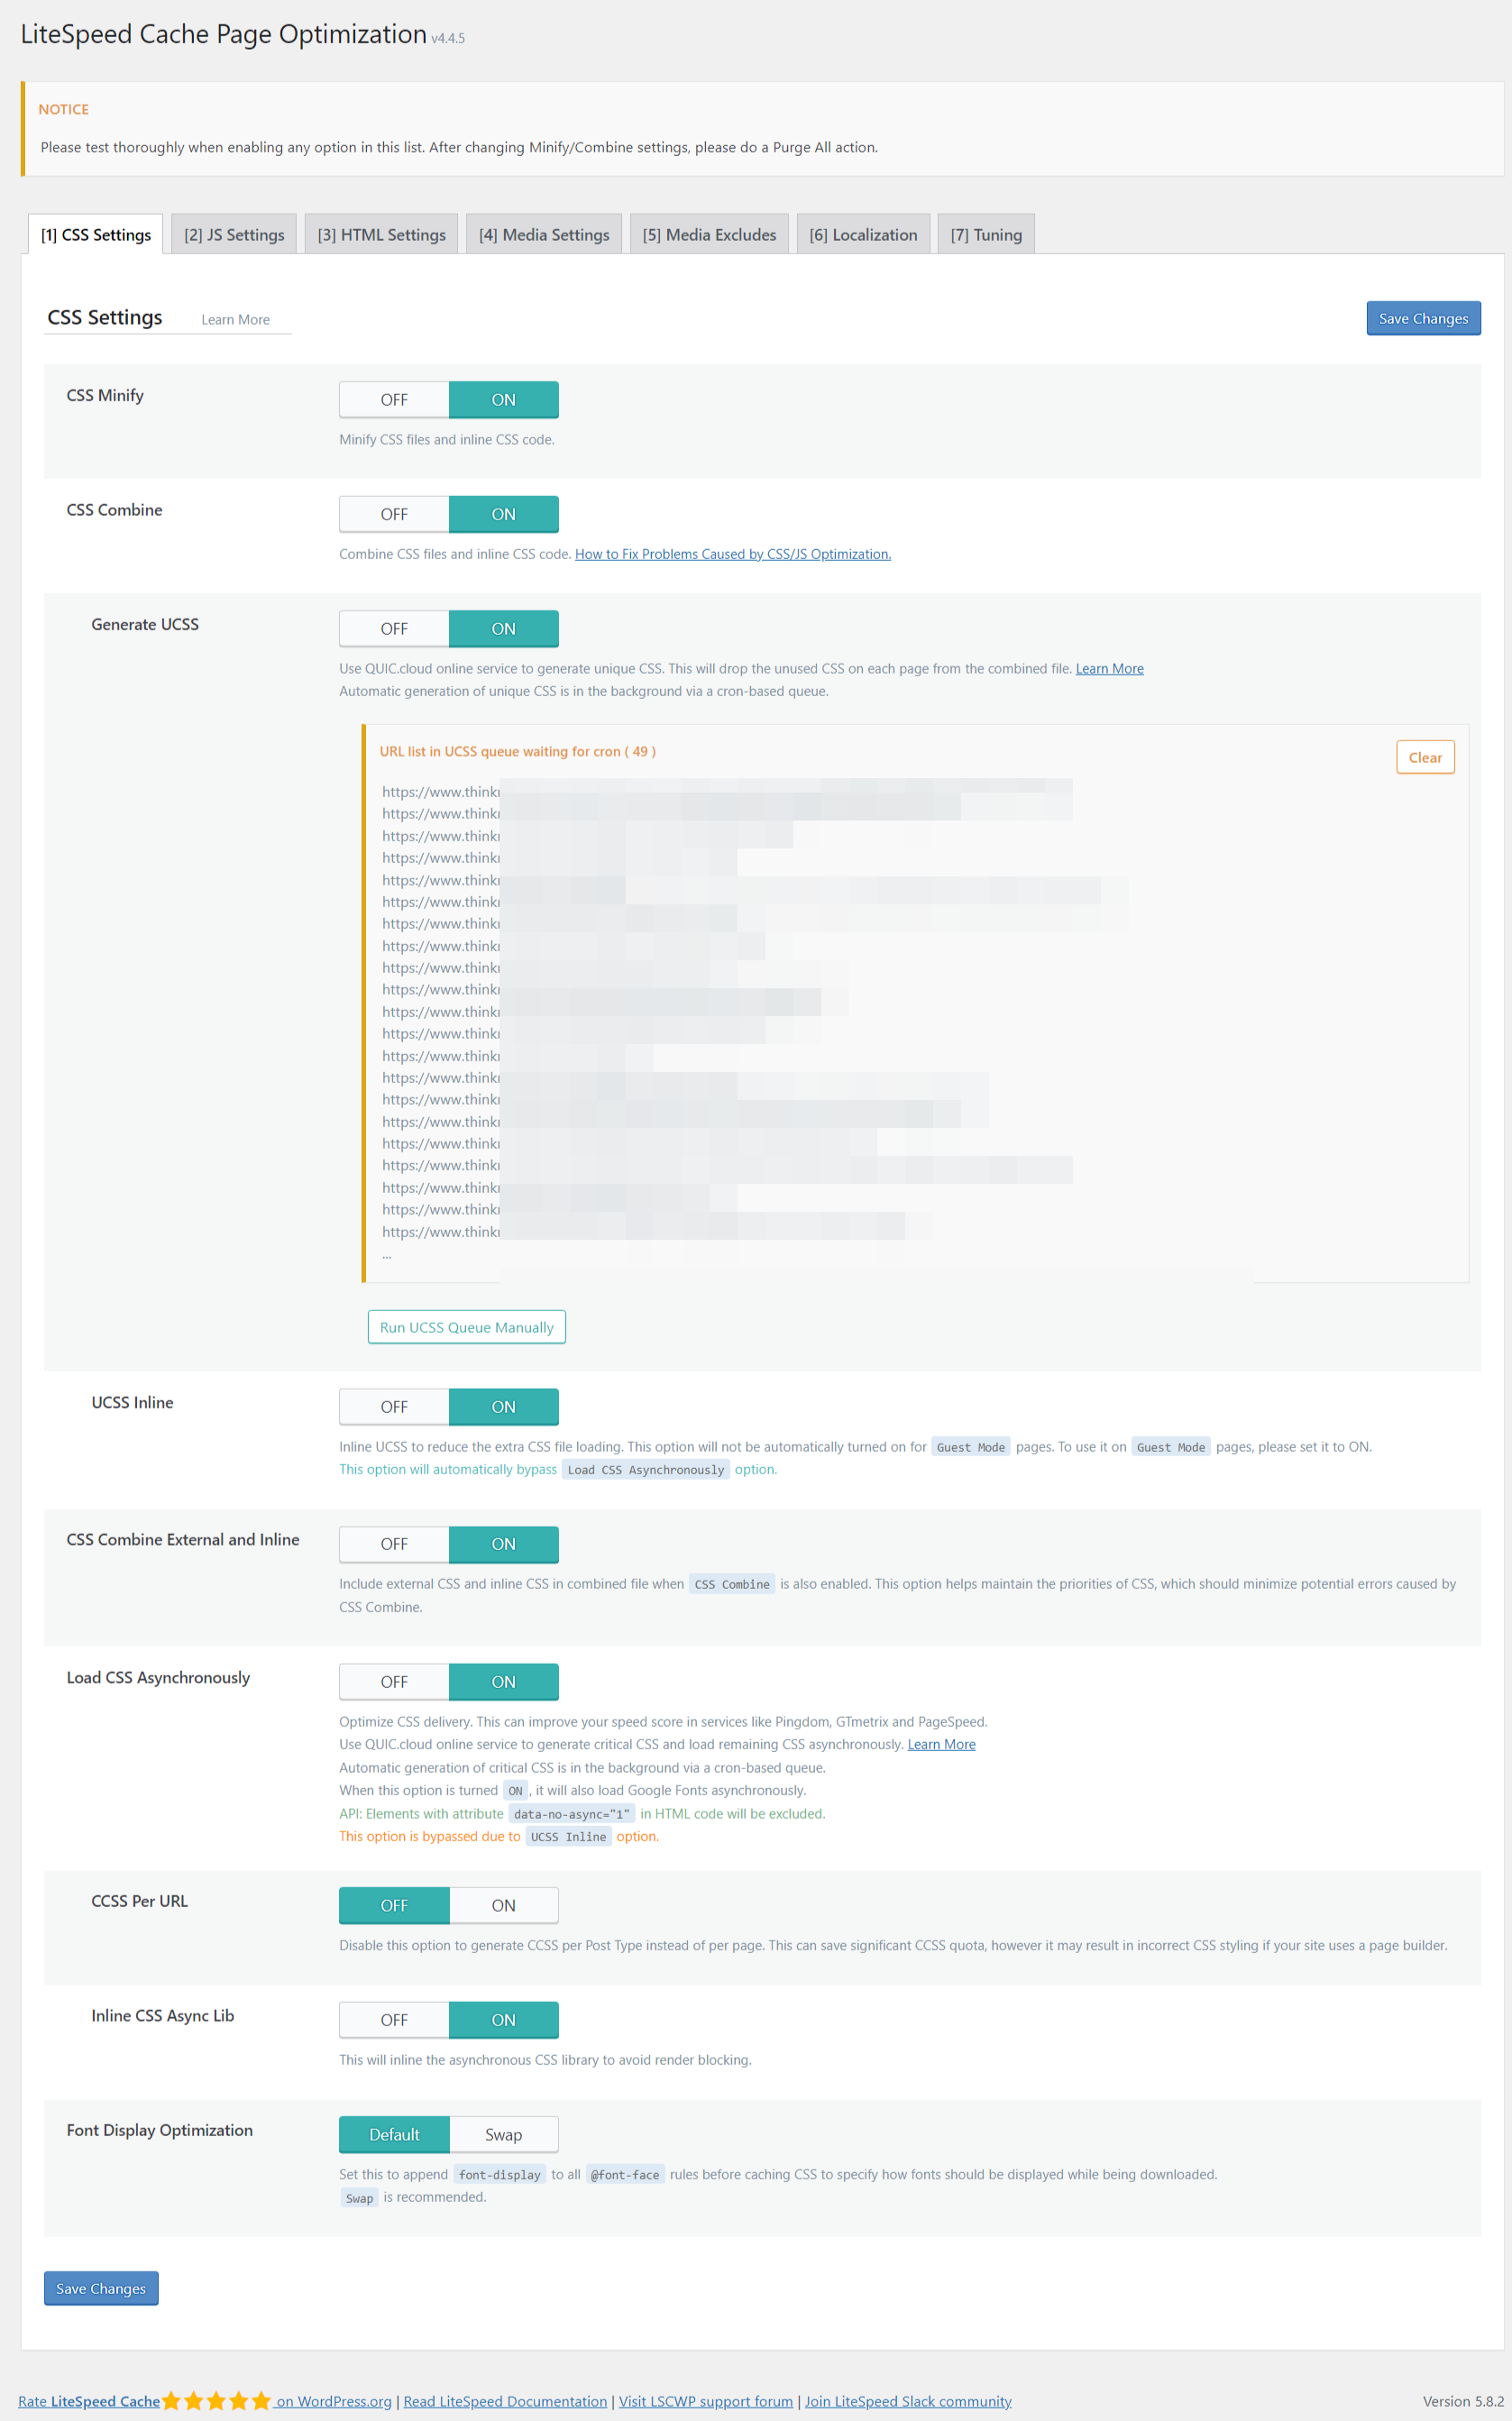
CSS Settings
- CSS Minify – ON
- … Combine – OFF
- Generate UCSS – OFF
- UCSS Inline – OFF
- CSS Combine External and Inline – OFF
- Load CSS Asynchronously – OFF
- CCSS Per URL – OFF
- Inline CSS Async Lib – OFF
- Font Display Optimization – default
JS Settings
- JS Minify – ON
- … Combine – OFF
- JS Combine External and Inline – OFF
- Load JS Deferred – Deferred. If this setting breaks the site then revert back to the default setting OFF. In most cases, this setting can improve core web vitals, by improving the CLS score. But some hosting services may not adapt properly. Then, use the default setting.
HTML Settings
- HTML Minify – ON
- DNS Prefetch
- DNS Prefetch Control
- HTML Lazy Load Selectors
- Remove Query Strings
- Load Google Fonts Asynchronously – ON
- Remove Google Fonts – OFF. If you are using system fonts, then you can turn it ON. In most cases, for better typography you use one of the Google fonts. In that case, you need to set both 6. and 7. as above.
- Remove WordPress Emoji – ON
- Remove Noscript Tags – ON
Other settings you can leave in the default state.
Media Settings
- Lazy Load Images – ON
- Basic Image Placeholder – Provide a default image, to be used as placeholder
- Responsive Placeholder – ON. If you want the above placeholder to be responsive on mobile.
- Responsive Placeholder SVG – Upload the SVG version of placeholder.
- Responsive Placeholder Color – Change it if you feel it.
- LQIP Cloud Generator – ON. If you are using high quality image placeholders. This will reduce its size. LQIP stands for Low-quality Image Placeholder.
- LQIP Quality
- … Minimum Dimensions
- Generate LQIP In Background
- Lazy Load Iframes – ON
- Add Missing Sizes – ON
- Inline Lazy Load Images Library – ON
Leave other settings as default.
Media Excludes
- Lazy Load Image Excludes
- Lazy Load Image Class Name Excludes
- … Parent Class Name Excludes
- Lazy Load Iframe Class Name Excludes
- .. Iframe Parent Class Name Excludes
- Lazy Load URI Excludes
- LQIP Excludes
If you want to prevent a lazy load of above-the-fold images, class-based exclusion then these settings can be useful. These are for advanced users.
Localization
- Gravatar Cache
- Gravatar Cache Cron – ON
- .. TTL – ON
- Gravatar Cache TTL – default
Tuning
- CSS Excludes
- JS Excludes
- UCSS Whitelist
- UCSS URI Excludes
- Separate CCSS Cache Post Types
- Separate CCSS Cache URIs
- Critical CSS Rules
- JS Deferred Excludes
- Guest Mode JS Excludes
- URI Excludes
- Optimize for Guests Only
- Role Excludes
Keep the default settings.
Database
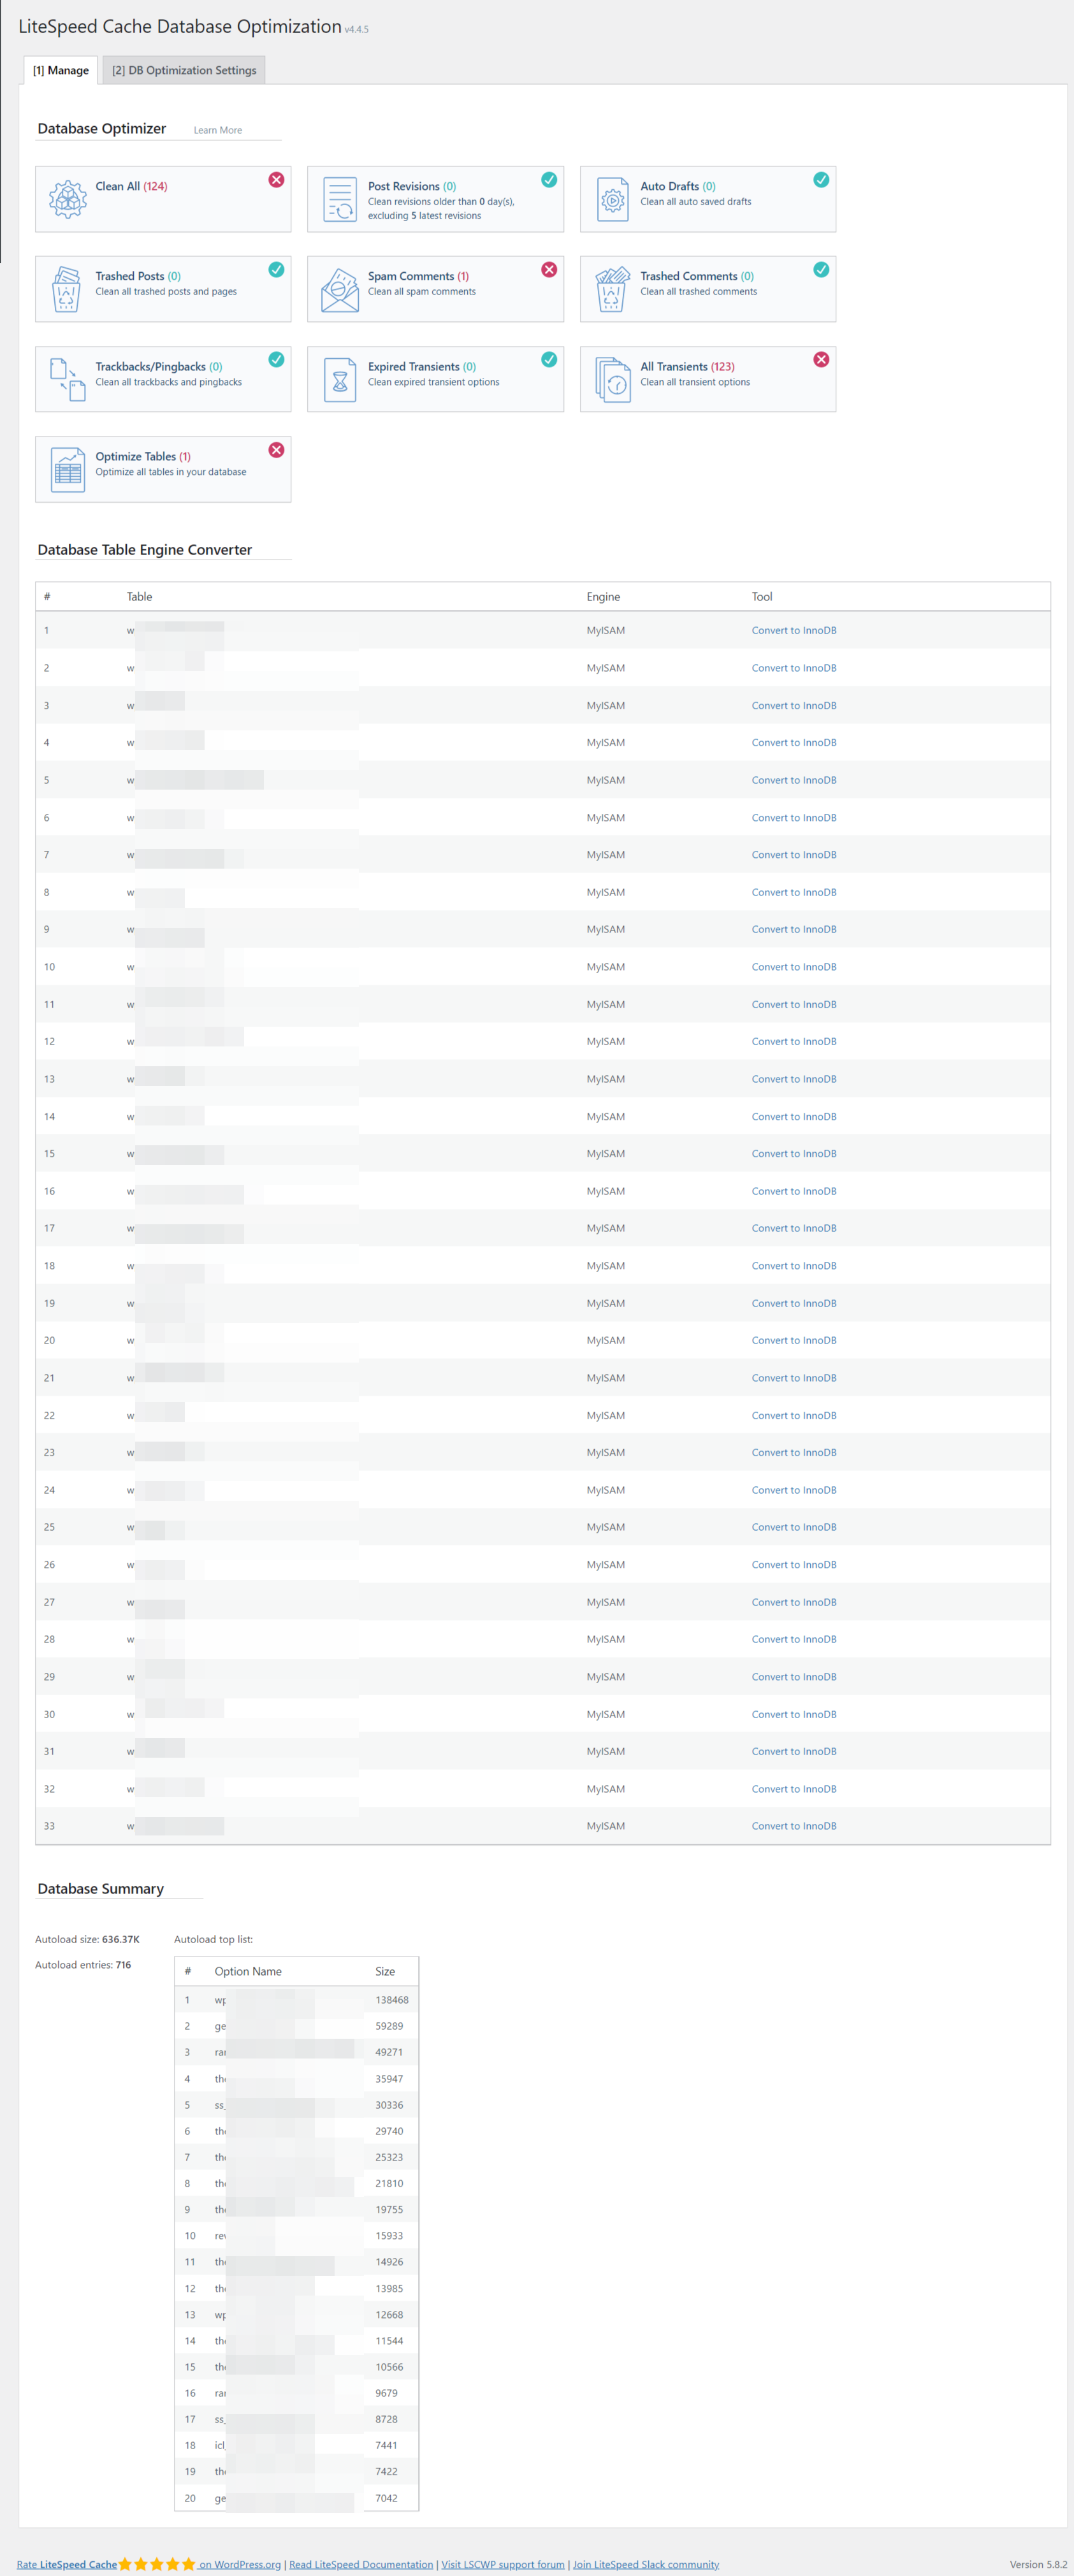
- Manage – Database Optimizer – Empty the transients, post revisions, auto drafts, spam comments, trashed comments, optimize tables etc can be done here.
- Database Table Engine Converter – Display of db tables which are more technical and can be left alone.
- Database Summary – Autoload size and entries of the db tables are mentioned here.
DB Optimization Settings
- Revisions Max Number – 5 to 10 . By keeping this value you will be able to keep the revisions of db tables. Too many revisions can cause bloating. If your DB space is less, keep it to a minimum. But default of 0 is not advisable, as you will not have backup.
- Revisions Max Age – Default
Crawler
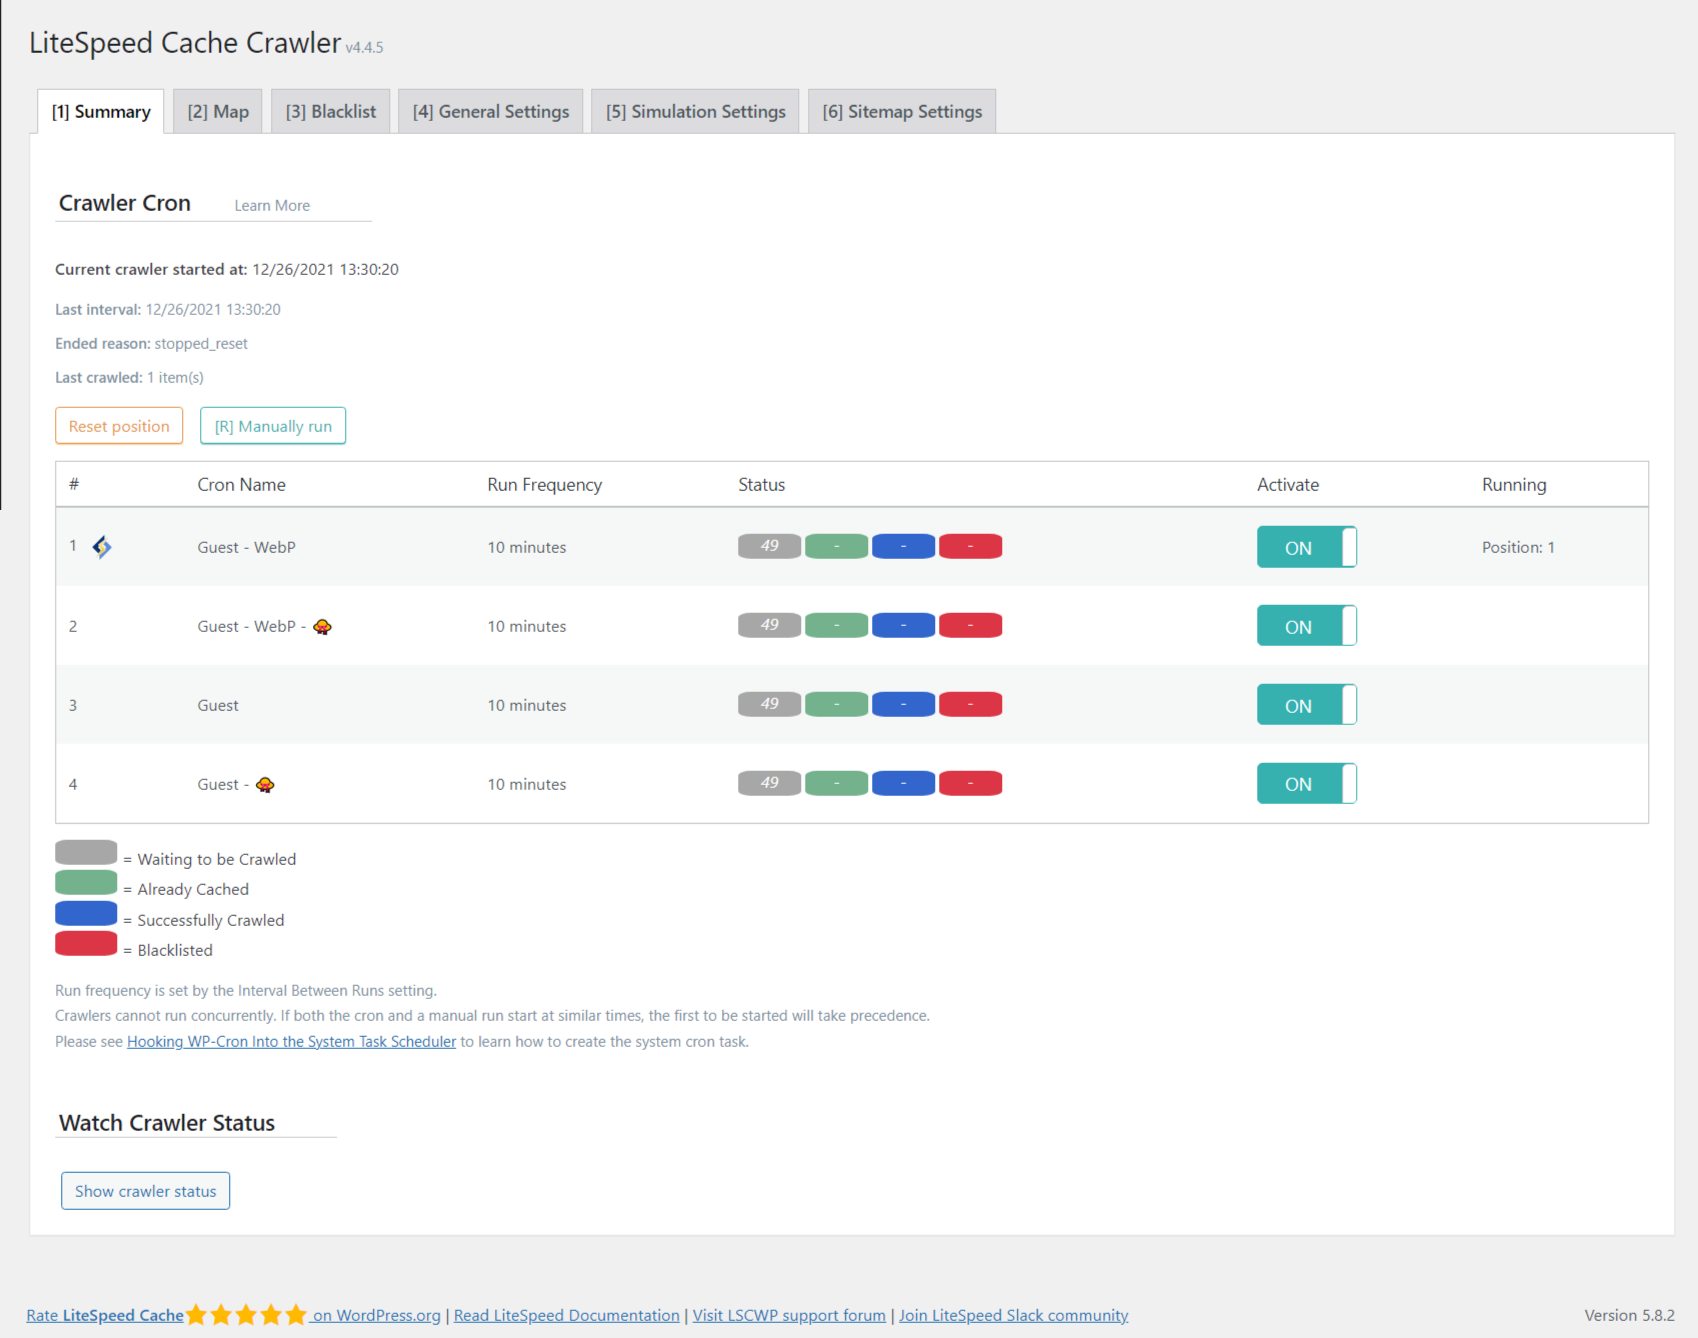
This setting is used to crawl the expired cache of pages and refresh them. But it consumes a lot of resources. That is why it is not allowed by most of the shared hosting plans. But if you have a dedicated server, you can turn it on the General setting page. You need to enable the Crawler, submit your sitemap and then leave the other settings to default.
Summary
- Crawler Cron
- Watch Crawler Status
Map
- Sitemap List
Blacklist
General Settings
- Crawler
- Delay
- Run Duration
- Interval Between Runs
- Crawl Interval
- Threads
- Timeout
- Server Load Limit
Simulation Settings
- Role Simulation
- Cookie Simulation
Sitemap Settings
- Custom Sitemap
- Drop Domain from Sitemap
- Sitemap Timeout
Toolbox
Purge
This setting is useful to purge your LiteSpeed Cache at an individual level. There are different types of purge level settings like –
- Purge Front Page
- Purge pages
- … 403 error
- Purge 404 error
- Purge 500 error
- … – LS Cache
- Purge All – CSS/JS cache
- Purge All – Object Cache
- … – Opcode Cache
- Purge All – Unique CSS
- Purge All – LQIP Cache
- .. – Gravatar Cache
- Purge All
- Empty entire cache
Purge means to clear the cache on the server and CDN. The last two settings are useful if your front end is not displaying as intended. Even if you make changes to the site design, it may not display correctly. In such a situation, using the Empty entire cache can be useful. But it should not always be used. As that will reduce the performance speed of the site.
You can also purge the cache by category, post id, tag, url.
Import/Export
- Export Settings
- Import Settings
- Reset All Settings
If you want to use the same LiteSpeed Cache settings on another site, then you can export and import them. The exported settings file is a .data file. Then you can import those settings into a new site. It saves time to configure all the settings again on a fresh site. Sometimes, settings can cause issues and even after purging the cache, the site may not work as intended. In such a case, you can reset all the LiteSpeed Cache settings to their default and start fresh.
View .htaccess
LiteSpeed Cache View .htaccess
The LiteSpeed Cache settings will add some code to your .htaccess file. This is a file stored in the root directory of your site. It is an important configuration file for your site. You can view the file path and contents of .htaccess here.
.htaccess Path
- Frontend .htaccess Path
- Backend .htaccess Path
Current .htaccess Contents
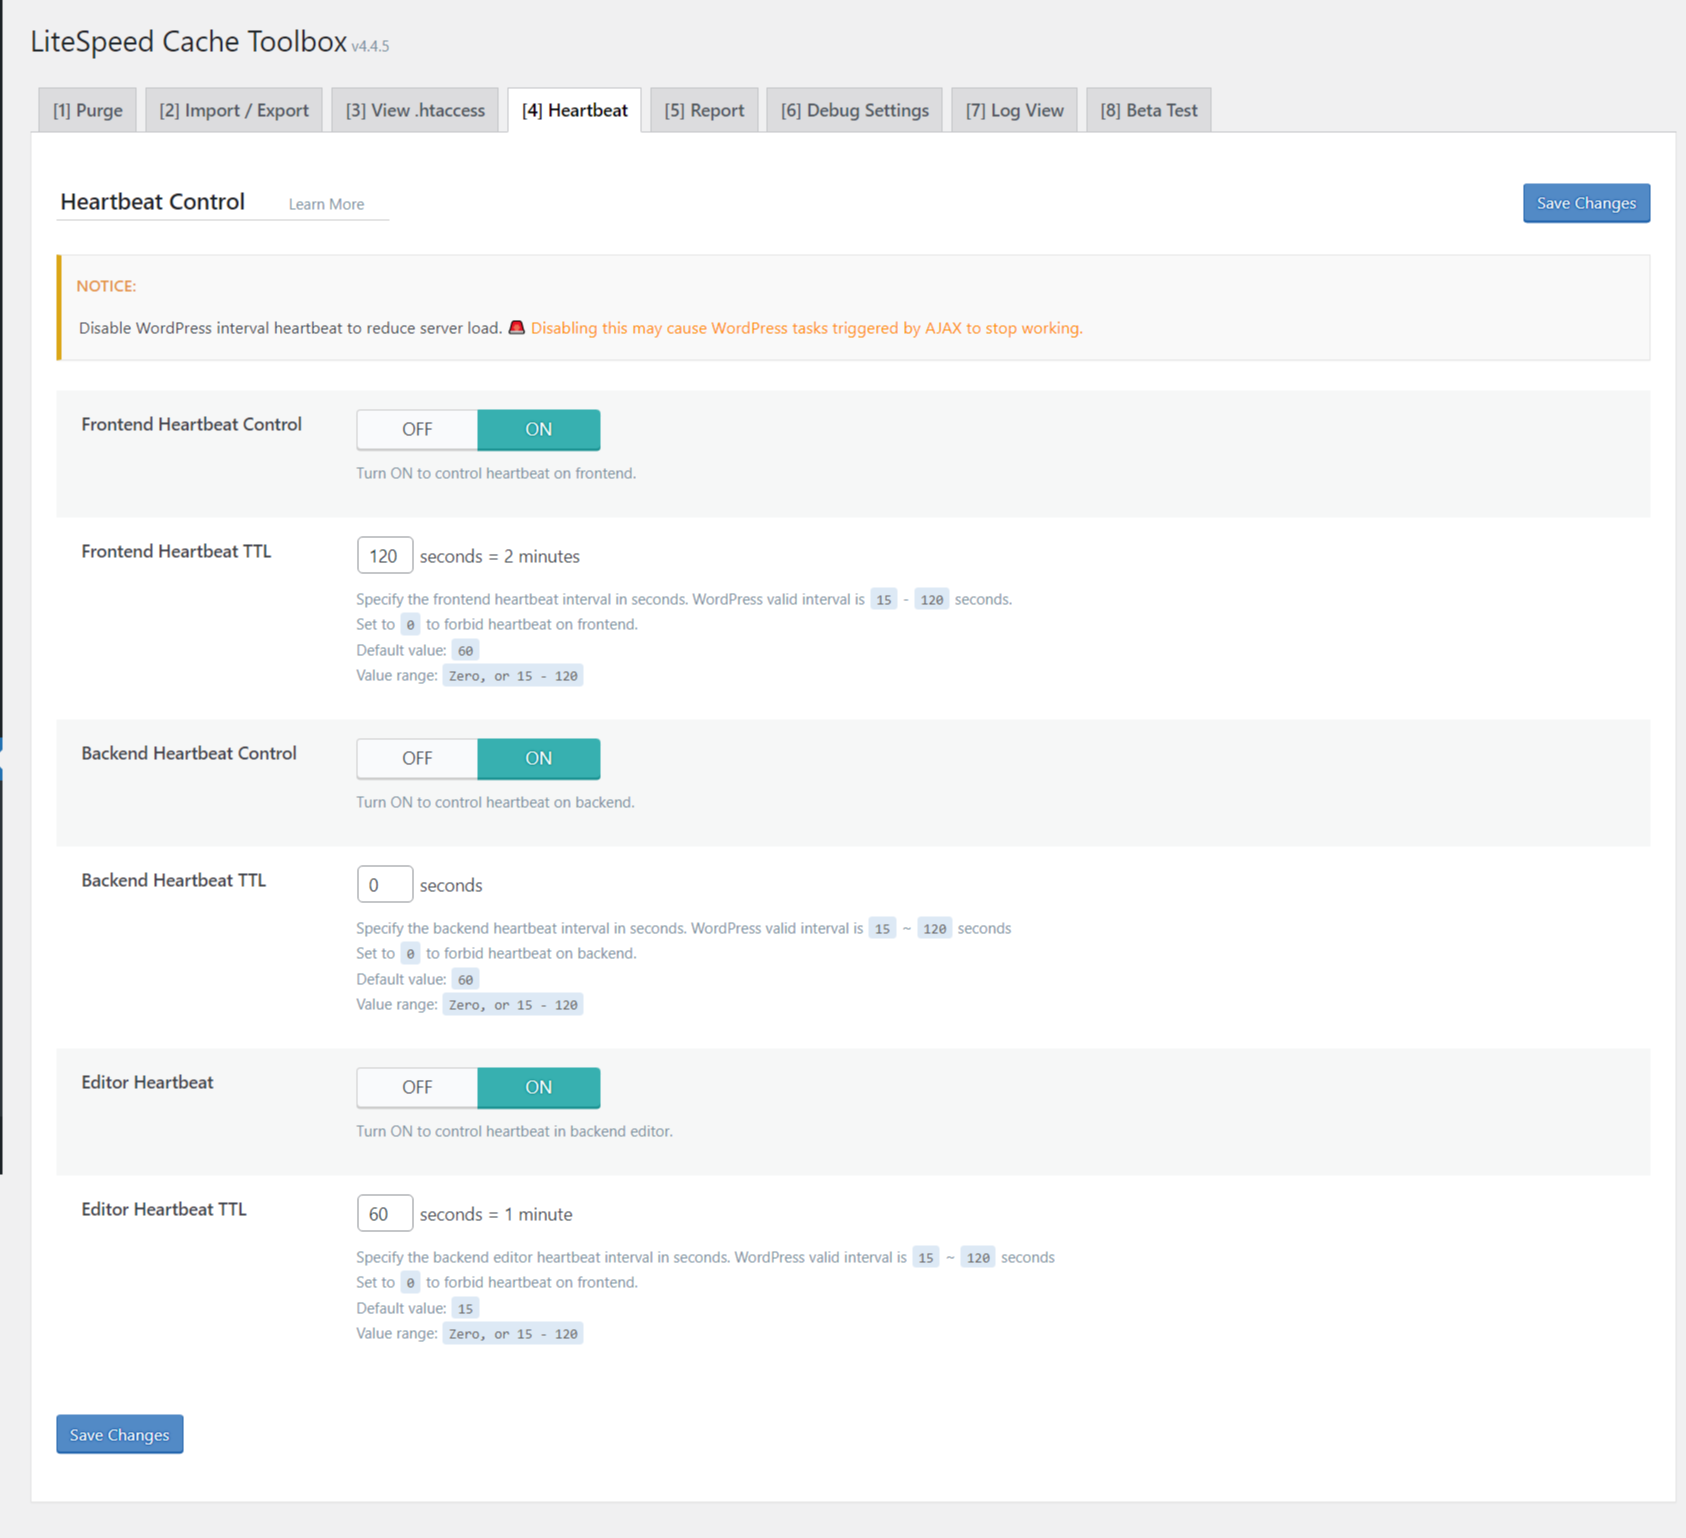
Heartbeat
Heartbeat Control
You do want to limit the heartbeat timing, as it consumes a lot of resources. Most cache plugins only provide a single control of Heartbeat. But in the LiteSpeed Cache plugin case several settings are provided.
- Frontend Heartbeat Control – ON
- Frontend Heartbeat TTL – 120
- Backend Heartbeat Control – ON
- Backend Heartbeat TTL – 0
- Editor Heartbeat – ON
- Editor Heartbeat TTL – 60
Most of the heartbeat settings improve the WordPress dashboard performance by performing quick operations.
Report
LiteSpeed Report
- System Information
- Passwordless Link
- Notes
The site and server information is mentioned above. But if you want to provide admin access to the LiteSpeed technical support team, you can create a passwordless link and send it to them. In that way they can debug your site for LiteSpeed Cache settings or issues and make changes.
Debug Settings
- Disable All Features
- Debug Log
- Admin IPs
- Debug Level
- Log File Size Limit
- Log Cookies
- Collapse Query Strings
- Debug URI Includes
- Debug URI Excludes
Most of the above settings are used to debug the features of the LiteSpeed cache plugin. If you are a technical expert and can understand PHP and plugin code, then these settings are useful to you. Otherwise, you can leave the default settings.
Log View
You can clear the debug log and other debugging information from here.
Beta Test
Generally, stable builds are updated to the latest version of LiteSpeed cache plugin. But if you want to use the beta builds from GitHub directory, then you can make the setting change here.

This is a fantastic post that contains a lot of useful information. I appreciate you writing on LiteSpeed Cache for WordPress since it’s really useful to us.
Hello, I have a question about LiteSpeed Cache. Do you need to use these third-party cloud and redis services in this plugin to see positive differences in website speed. And why, after installing this plugin, the database is many times larger. I have a small website on the lite speed server https://www.totemat.pl/ and I do not know why it is that when I run this plugin, the website works slower than faster according to google page speed. Maybe you have any suggestions?
@Thanks for your question. You can use LS Server + LS Cache + Cloudflare (Free) and see the difference. Also the default settings of LS cache are good enough to give good speed. Check if you have Adsense or any other third-party JS code enabled. They can slow down. Check with WebPageTest tool to see the waterfall where the resources are taking time. Then you can reduce that. Also, DB optimization tool is there in LS cache. You can optimize the db with that. Let me know if you have any other questions.
@TOTEMAT I am just starting using this plugin. I see your site as of today (10-5-2023) runs quick. Did you stay with Lightspeed cache alone? Or did you combine with a CDN? If you are willing to share your experience I’d apricate it. tyia