As a WordPress site owner you need to provide a consent form on your site for TCF v2.0 implementation. This is to pass the Transparency and Consent String (TC String) from the CMP to the advertisers. Then, you can display the relevant ads based upon the consent given by the visitor.
In this guide, we are going to see how to implement the TCF v2.0 consent in WordPress. For this we need a CMP and a plugin to implement the Adsense ads.
- For CMP we are going to use Quantcast
- To include Adsense Ads we are going to use Ad Inserter Pro plugin
Related – Quantcast Choice – How to Create CMP Form for TCF v2.0 implementation
You can use the free version of this plugin to include ads in certain positions. But the Pro version has some additional benefits. You can immediately load the ads, once the consent is given by the visitor in Ad Inserter Pro. This is not possible with the FREE version. You have to refresh the page to see the ads.
Related – [Review] #1 Best AMP Plugin in 2020 – Ideal Settings
The main purpose of Ad Inserter Pro is to place the ads in whichever position we require. Also, we will be passing the TC string from the CMP form to the ad vendors using this plugin.
How to display Google Adsense Ads in WordPress with TCF v2.0
The other type of ads also behave in a similar fashion.
- Login to your WordPress dashboard.
- Install the Ad Inserter Pro plugin and add the license you purchased.
- Login to your Adsense dashboard.
- Copy the relevant ad codes or JS tags for each ad.
- Ad Inserter plugin uses “blocks” to store each ad and display them.
- Click the gear icon (settings) of the plugin.
- Click on the “Header” tab of this screen.
- Now paste the “Universal tag” of your Quantcast Choice. Consent Manager Tag v2.0 (for TCF 2.0) copied earlier here.
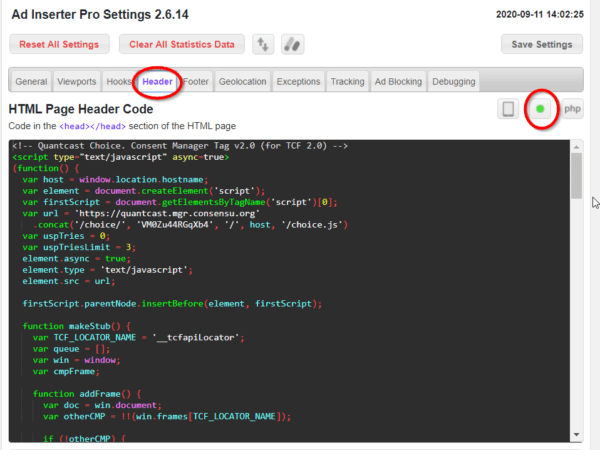
- Click on the grey dot, so it turns to green. This enables insertion of your code in the HTML editor into the header of every page.
- In the WordPress dashboard, Plugins > Add New . Search for “Quantcast Choice“. Install and Activate it.
- On the left-hand side, you can see “QC Choice“. This is where you can set the settings for the plugin.
- In the Overview tab, you can see some details on how to set up TCF v2.0 in the Quantcast Choice and advanced setup details.
- On the next tab, you can see – TCF v2.0 Settings. Here you have to provide the following details.
- Universal Tag Id (UTID) – This is your ptag code in the Quantcast Choice dashboard, without the p.
- Enable Choice TCF v2.0 – Select Yes. This will enable the consent form to be displayed.
- Push IAB and non-IAN consent data to the data layer – Select Yes.
- Automatically add footer CCPA message – This is to include the CCPA message for California Consumer Protection Act. If you have enabled this in Quantcast Choice, then you can enable it for automatic or manual insertion.
- This completes the “Quantcast Choice” WordPress plugin settings.
Ad Inserter Pro Settings for TCF v2.0
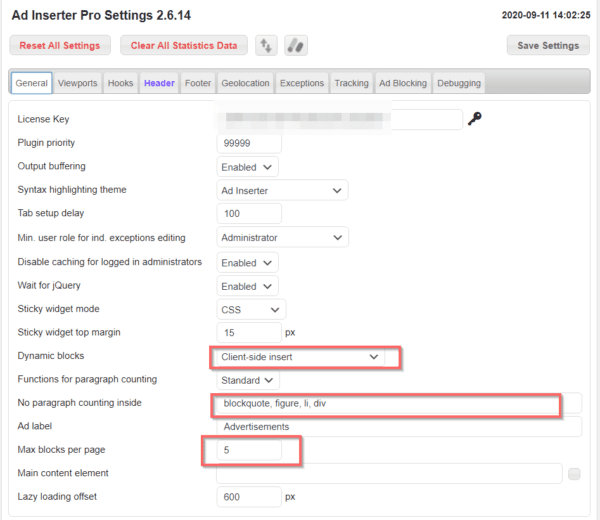
- Click on the “General” option of Ad Inserter Pro plugin.
- Then you have to make changes to a few of the options.
- Dynamic blocks – Client-side insert
- No paragraph counting inside – add div to the existing tags
- Change the Max. blocks per page to your requirement.
- Now paste your Adsense code in each block.
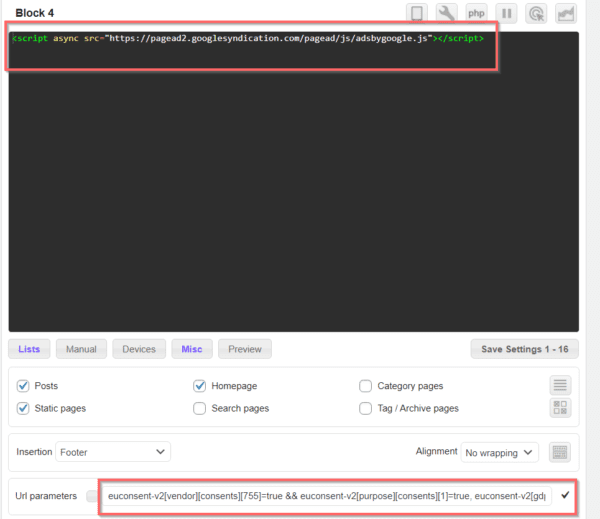
13. In order to save server processor time and resources, you can paste the first tag of your Adsense ad in one block. This script code is common to all the Adsense ad codes.
<script async src="https://www.pagead2.googlesyndication.com/pagead/js/adsbygoogle.js"></script>
- Below the block, click on “Lists”. Select the relevant post types on which you want to include the Adsense ads.
- Select Insertion – Footer and Alignment – No Wrapping for this piece of script code.
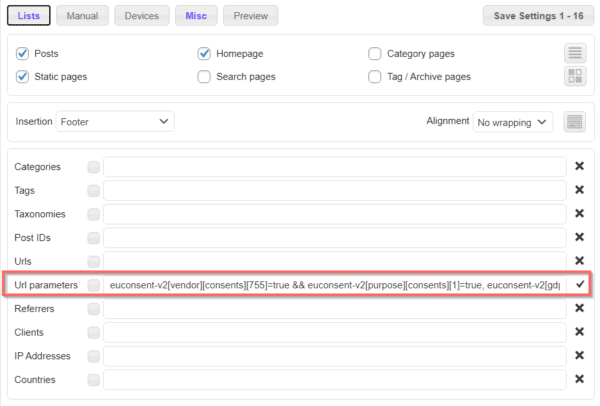
- Double click on “Lists” until you see all the options under it.
- For URL parameters copy this code in the box –
euconsent-v2[vendor][consents][755]=true && euconsent-v2[purpose][consents][1]=true, euconsent-v2[gdprApplies]=false
- Then click the x mark to tick mark, which white lists the code.
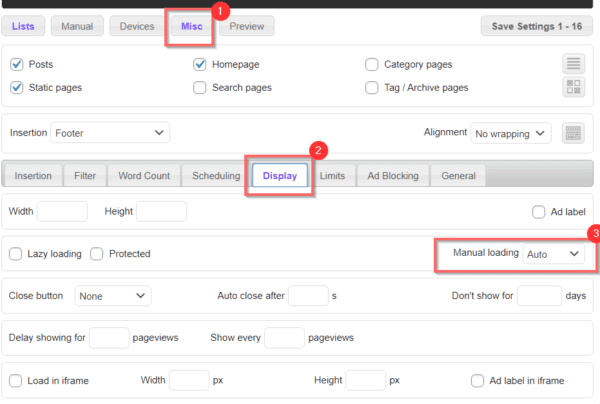
- Click on Misc > Display. Select Manual loading – auto. This is for the ads to display immediately, once the consent has been given through the CMP form. Then the TC string will be passed to the Adsense code. This will prevent the requirement to refresh the page.
- Repeats steps 14-19 for each ad block, to display different Adsense ads.
- Then click on “Save Settings”.
Now your TCF v2.0 implementation is complete. Adsense Ads will be displayed, once the consent is given by the visitor.

Thanks for this great guide.
I have just one question: I didn’t get the part of Quantcast plugin? Why would we need it if we already got Quantcast code from their site and put it in the header of our website?!
@Jeff. With the plugin version you can change advanced settings. Instead of going to the Quantcast CMP dashboard, you can manage somethings here. That’s what I think.
Ah, OK. Thank you.