Are you looking to set up your email client with DreamHost SMTP settings? Whether you’re using Outlook, Thunderbird, or another email client, configuring your DreamHost email settings is essential for sending and receiving emails through your DreamHost account.
While setting up a custom email on a hosting server, you need the right setup. Then you can forward it to any other mail of your choice. But most computer users would like to use it with an email client like Outlook, Mailbird, Spark, Postbox etc.
To get started, you’ll need to know your DreamHost IMAP settings and SMTP DreamHost settings. These settings allow your email client to communicate with the DreamHost mail servers, ensuring that your emails are delivered promptly and securely.
DreamHost Outlook Settings
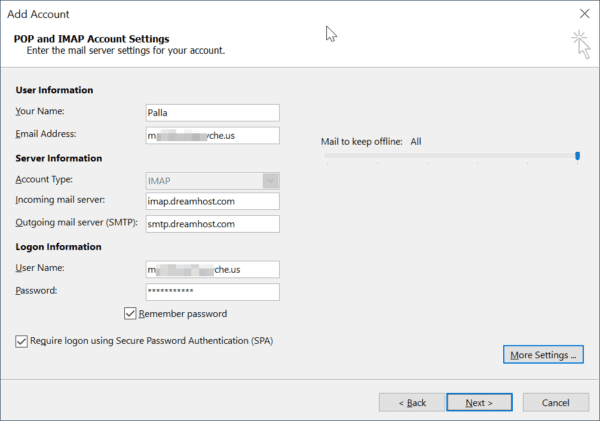
The Server Information should be the following
a. Account Type : IMAP (DreamHost prefers it this way)
b. Incoming mail server : imap.dreamhost.com
c. Outgoing mail server (SMTP): smtp.dreamhost.com
Check the option that says “Require logon using Secure Password Authentication (SPA)“. Then click on “More Settings“.

DreamHost Incoming and Outgoing Servers with Port Numbers
1. On the “Outgoing Server” tab, check the option that says
– My outgoing server (SMTP) requires authentication
2. On the Advanced tab, the following should be changed.
a. Incoming Server (IMAP) : 993
b. Outgoing Server (SMTP) : 465
For both of them the option that says “Use the following type of encrypted connection” should be SSL.
Then click “OK“.
On the main window, click on “Next“.
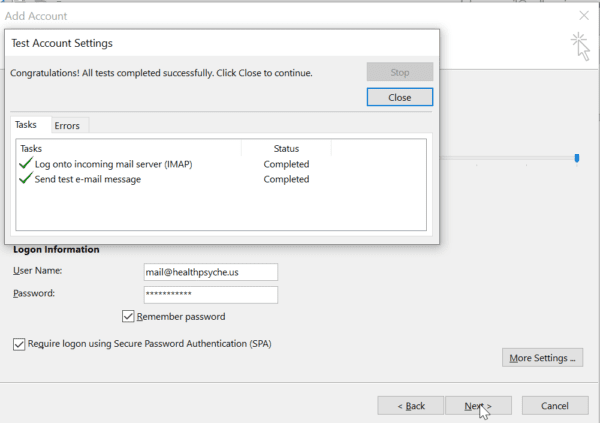
The same email acccount with DreamHost IMAP details is created in Outlook.

You should see something like mail@customdomain for this account.
Dreamhost Mail Server Settings
If you’re using Outlook, you’ll need to configure your DreamHost Outlook settings. This involves entering your DreamHost outgoing mail server details, as well as your username and password. Once you’ve entered these details, you’ll be able to send and receive emails through your DreamHost account.
For those using webmail, settings are slightly different. You’ll need to log in to your DreamHost webmail account and navigate to the settings menu. From there, you can configure your DreamHost mail server settings and ensure that your emails are being delivered to your inbox.
Whether you’re setting up email on your desktop or mobile device, DreamHost mail setup is a straightforward process. By following the steps outlined in the DreamHost knowledge base, you can ensure that your DreamHost SMTP server is configured correctly and that your emails are being delivered reliably.
Dreamhost Email Outlook

Settings need to be correct if they need to work correctly with the DreamHost server. Port numbers are taken by default for certain email clients, while you need to change them based on security or insecure protocols.
Since each email client is different, we’re providing the general POP, IMAP, SMTP settings with their required port numbers. This is a quick reference that becomes handy during email configuration.
DreamHost POP Settings
Based on your decision to use POP or IMAP, choose the corresponding port number below. Once again, secure IMAP is recommended.
Recommended — Incoming POP secure
- POP3 | Port 995 (Secure Transport — SSL function enabled)
Other options
- POP3 | Port 110 (Insecure Transport — No SSL function enabled)
DreamHost IMAP Settings
Recommended — Incoming IMAP secure
- IMAP | Port 993 (Secure Transport — SSL function enabled)
Other options
- IMAP | Port 143 (Insecure Transport — No SSL function enabled)
DreamHost SMTP Settings
Simple Mail Transfer Protocol (SMTP) is the de facto standard for outgoing email transmissions across the Internet.
Recommended outgoing ports
- SMTP | Port 465 (Secure Transport — SSL function enabled)
- SMTP | Port 587 (Insecure Transport, but can be upgraded to a secure connection using STARTTLS)
Not recommended
- SMTP | Port 25 (Outdated and not recommended. username/password authentication MUST be enabled if using this port.)
Port 465 with SSL is recommended, however some email clients are unable to use this port.
If you are unable to use port 465, the next best option is port 587 using STARTTLS.
Source: DreamHost
The “Internet E-mail Settings” window will open.
Conclusion
As we can see above it is very easy to setup email in Outlook, if you have the right mail settings at hand. I was able to test a sample email account with some trial and error. If you don’t check the SSL option or use the right port, your email may not work.
The top DreamHost review about its features, plans, pricing and pro services can be seen here.
So I recommend you to use the above combination of DreamHost and Outlook for easy configuration.
In conclusion, setting up your email client with DreamHost SMTP settings is essential for anyone looking to send and receive emails through their DreamHost account. By configuring your DreamHost email settings correctly, you can ensure that your emails are delivered promptly and securely.

Thx for this help.
Still have trouble with ports and settings. I am attempting to set up Outlook as client.
Note this contradiction re SPA:
(i) Dreamhost advice {https://www.help.dreamhost.com/hc/en-us/articles/115001316792-Outlook-Configuring-email-with-Outlook-on-Office-365}
(ii) you (WPreview)do not explain but in your image above the SPA box is checked.
(iii) mailbird.com, regarding Dreamhost specifically, provides an image where SPA is unchecked. { cf. https://www.getmailbird.com/setup/access-dreamhost-com-via-imap-smtp#outlook}
This tip re : was useful. It worked for me (on Outlook 365 / Windows 11) and resolved the failing advice direct from Dreamhost
https://www.help.dreamhost.com/hc/en-us/articles/115001316792-Outlook-Configuring-email-with-Outlook-on-Office-365.
Thx !
–
Note, however, that the manual adding of an account on Outlook 365 ( I mean MS Office program, not Web Outlook, if that is what you meant here).. does not produce the layout that your image above shows (cf. below the phrase
–
The layout one arrives at in MS Office 365, under Account / “Server Settings” does not have ” More Settings.” The options are constrained to these items:
Incoming Outgoing
Protocol IMAP SMTP
Server imap.dreamhost.com smtp.dreamhost.com
Port 993 587
SSL: SSL/TLS STARTTLS
SPA (leave blank) (leave blank*)
* re SPA for outoging: Outlook should do something automatically, so that later, when you return to this screen, you see checked thes secondary boxes: ” SMTP requires authentication” and “use same settings as my incoming mail server”
–
Thx — hope you can refine your notes even more !